
Recently, got a SATA Solid-State Drive? Congrats on that! Well, it’s time to upgrade you’re old HP Envy 17 T Laptop, with SSD. Without any hassle, you can complete the task on your own. No need to visit a Technician, pay them some bucks to upgrade your Laptop. Investing a few minutes reading the whole article, will help you to explore the necessary steps in a Chronological manner “To install SSD in HP Envy 17 T Laptop”
In case, if you haven’t bought an SSD, due to lack of knowledge “Which SSD is a compatible one for HP Envy 17 T Laptop?” SATA SSDs “2.5 Inch” are compatible with Solid-State Drives for HP Envy 17 T Laptop.
If you go through the Manual of HP Envy 17, you will find the storage limit stated for SSD is 160GB. As per an expert suggestion, you can make use of any available SATA SSD storage to upgrade your HP Envy 17-T laptop. Well, you can rely on 250GB, 500GB SSDs to store and run OS files. Moreover, you can make use of the Hard Drive Disk for storage purposes.
For sure, you will love the Booting and Functional Speed of your old HP Envy 17 T Laptop, after upgrading with a compatible SSD. Fortunately, the 17T laptop (HP Envy 17t-j003sg) which we are going to use here comes with two hard drive slots. Most of the laptops in this series come with two slots. But, if there is only one slot, you can easily follow the process.
Before you proceed with the steps, I insist you have a Data Backup for all your valuable files and documents. Save a copy of your valuable Data in External Drive or even you can rely on Cloud Storages. Moreover, you can make use of free backup software to save DATA.
Below-Stated, are some of the (Reliable) Best Backup Software.
- EaseUS Todo Backup Free
- Paragon Backup & Recovery
- FBackup
- Cobian Backup
Let’s go through the necessary steps to upgrade Laptop with Solid-State Drive.
If you are not sure which SSD you should buy for your laptop, just read this SSD buyer’s guide.
Steps to Install SSD in HP Envy 17 T Laptop
Firstly, make sure you have a compatible Screwdriver to open the panels of the Laptop. Generally, the size for the screwdriver is #1, #0, #00 for mini laptop screws.
In case, if you don’t have the compatible Screwdriver kindly, get them from Amazon. It’s like a one-time minimal investment, you can make use of the Tool Kit for multiple purposes.
Check Mini Screw Driver Kit on Amazon.
Step 1
Turn OFF your HP Envy 17 T Laptop and remove the battery. Simply, press the switch to the left and remove the battery. Now, press and hold the power button for a few seconds and release it, it will drain out the residual power from Laptop.

Step 2
Now, use the compatible Screw Driver to unscrew the back panel. Do not roughly try to pull off the screw, it will damage the back panel of your laptop. Make sure, you use a suitable Screwdriver to remove the screw.

Note: Place the Screw inside a mini box or at some proper place “It should not be misplaced or lost”
Step 3
Gently, remove the back panel of the HP Envy 17 T Laptop and place it aside. Now, make use of a soft brush to clean the dust particles.

Step 4
You will find a separate Drive Bay for SATA SSD, as shown in the above image. Kindly, unscrew the 4 Screws to dismantle the Drive Bay cover.

Note: Place the Cover and Screws in the proper place “It should not be misplaced or lost”
Step 5
Clear the dust particles from the SSD Slot using a soft brush, place the SATA SSD in HP Envy 17 T Laptop. Make sure, you set the Solid-State Drive properly in Drive Bay.
Make sure to insert your SSD at a proper angle and do not force it if it’s not getting in. Try again and you will succeed.

Step 6
This is the most important step, connect the SATA cable with the SSD connector of the HP Envy 17 T laptop. Gently, pull up the tip of the connector and insert the cable. Once done, gently push down the connector tip to fix Sold-State Drive.

Step 7
Now, attach the Drive Bay cover to the laptop and fix it with the 4 Screws.

Step 8
Gently, fix the Back Panel of the HP Envy 17 T laptop and tighten it with an appropriate screw.

Step 9
Now, insert the battery and fix the cover of the Laptop.

That’s it! You have completed the process “Install SSD in HP Envy 17 T Laptop” Now, what you have to do is simply move the existing Operating System to your newly installed SATA SSD.
I would like the recommend an amazing YouTube video if you face any difficulty with these steps.
How to move your existing OS to your new SSD?
The process of moving an existing OS to a newly Installed SATA SSD is quite simple. Here, you have to rely on Macrium Reflect Software. Simply, Turn ON your HP Envy 17 T Laptop and download the Macrium Reflect Software. Once done, install the same on your Laptop. Launch the Macrium Reflect Software, you will find OS Drive and Stored files.
Simply, give a checkmark on OS and other useful data, you will find an option “Clone this Disk” click on it and select the storage “SATA SSD” to complete the process “Mover existing OS to new SATA SSD”
Watch this YouTube video for a better understanding of how to move your OS using Macrium Reflect.
How to do a clean Windows Install in your new SSD?
Below is the process of installing and activating the new Windows in your HP Envy 17T (J-Series) laptop.
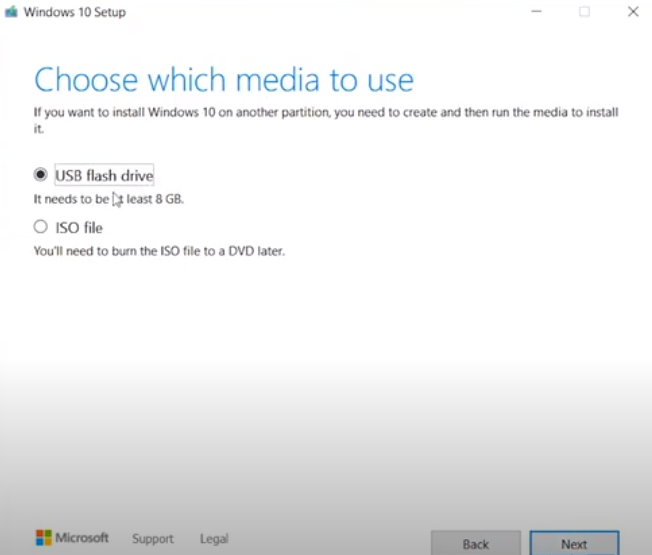
1. Create Windows Media Creation tool
For this process, you will need a pen drive/DVD in which you can make your bootable media drive. Consider having 8GB space at least in your DVD/pen drive. Make sure to format this drive before using it.

Download Windows Media Creation Tool for the Windows version of your interest. The tool is available for Windows 7, 8.1. and 10.
2. Install the Media creation tool on your pen drive/DVD
Once the download is finished, open this tool. Choose the option Create installation media for another PC. Choose the pen drive as your destination drive and let the Windows get downloaded inside it.
3. Enter the BIOS/UEFI and change boot device
Now, enter the BIOS/UEFI and disable Fast Boot and Secure Boot options. Just press F2 multiple times while the system is starting up and you will enter the UEFI.
- Go to the Advance Mode (F7) and go to the Boot tab. Now disable the Fast boot option.
2. Now, go to the Security tab and disable the secure boot Control option.
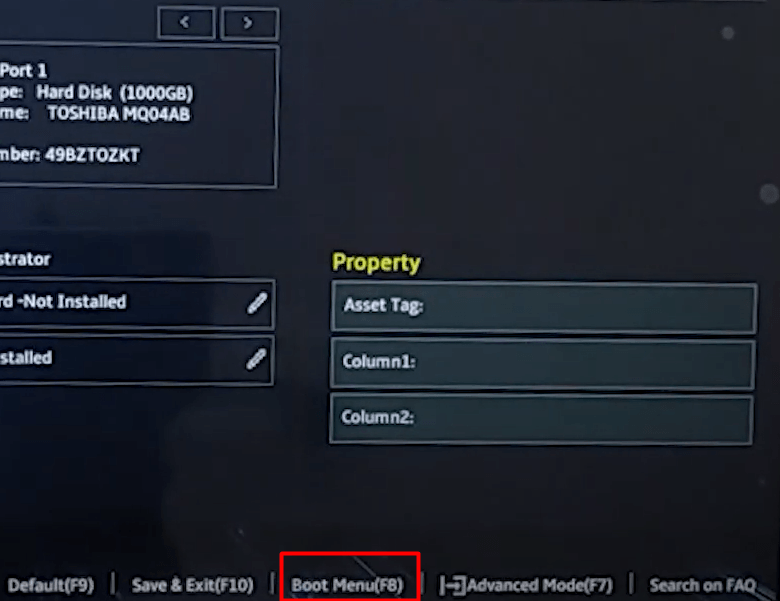
3. Lastly, in order to load your system from the pen drive, go to Boot Menu and select your pen drive or DVD where the Windows is downloaded.
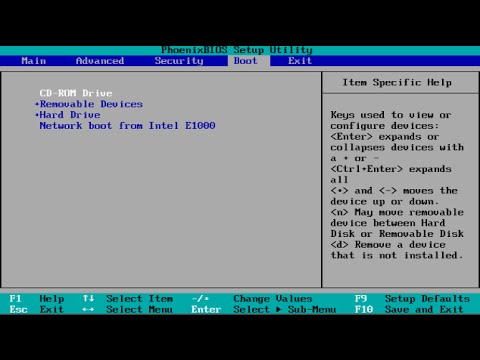
If your laptop is opening with a normal BIOS menu, go to the Boot tab and move the pen drive/DVD to the top to make it your boot drive. See the image below
4. Install and activate the Windows
The Windows Setup will start.
When you reach the menu, Where do you want to install Windows?, just choose your SSD and press Next. (You will probably see unallocated with your SSD).
Once the
If you have an activation key, just follow this procedure and activate the Windows.
- Go to Windows Control Panel.
- Click on System and security. Then select System.
- Click “Get more features with a new edition of Windows”.
- Select “I already have a product key”.
- Then enter your product key and click on Next.
For more information on Windows activation, visit this page.
Conclusion
In this article, I have introduced the relevant steps to install SSD in HP Envy 17 T Laptop. Once, you go through the whole article, you will be able to upgrade your laptop, without any hassle. In case, if you have any queries related to the topic kindly, note them in the given comment section. I’ll look into it.
Also Read: Best SSD for your laptop upgrade