
In the high-performance ecosystem of Solid State Drives (SSDs), the ATA TRIM command plays an indispensable role in managing the NAND flash memory blocks that constitute the storage medium.
By effectively communicating with the operating system, the TRIM command allows for the proactive deallocation of data blocks that have been marked as “deleted” or “unused.” This preemptive action minimizes write amplification and optimizes the SSD’s garbage collection routines, thereby enhancing both the drive’s write performance and its endurance over P/E (Program/Erase) cycles.
However, TRIM can make it hard and almost impossible to recover any deleted data using any program or method because the cells are permanently erased.

The objective of this article is to provide a comprehensive guide on leveraging the TRIM command to optimize SSD performance across various operating systems. We’ll delve into the technical aspects of enabling TRIM, verifying its activation, and scheduling regular TRIM operations to maintain optimal SSD health and performance.
What is TRIM?
The TRIM command is an ATA (Advanced Technology Attachment) command introduced to address the inherent limitations of NAND flash memory used in Solid State Drives (SSDs). In essence, TRIM serves as an interface between the operating system and the SSD, allowing the former to inform the latter about data blocks that are no longer in use and can be safely erased or rewritten.
Technical Functioning of TRIM
At a technical level, NAND flash memory is organized into pages, which are grouped into blocks. When data is written to an SSD, it is stored on these pages. However, unlike traditional Hard Disk Drives (HDDs), SSDs cannot overwrite existing data directly. Instead, the existing data must be erased first before new data can be written to the same location. This operation is known as a Program/Erase (P/E) cycle.
In the absence of TRIM, the SSD would not know which blocks are occupied by useful data and which are not. As a result, it would perform read-modify-write operations, reading the entire block into its cache, modifying the required pages, and then writing the entire block back. This process, known as write amplification, not only slows down write performance but also reduces the SSD’s lifespan by increasing the number of P/E cycles.
When TRIM is enabled, the operating system sends a list of unused blocks to the SSD controller. This allows the SSD to skip the read-modify-write operation for these blocks, directly erasing them instead. This minimizes write amplification and optimizes the internal garbage collection process, thereby enhancing both the performance and longevity of the SSD.
What is Write Amplification in SSDs?
In NAND flash memory, data is organized into pages, which are grouped into blocks. Unlike Hard Disk Drives (HDDs), SSDs can’t overwrite existing data directly. When new data needs to be written to a page that is already occupied, the SSD has to perform a series of operations:
- Read the Existing Block: The SSD reads the existing block into its cache.
- Modify: It modifies the data in the cache with the new data.
- Erase the Block: The SSD erases the entire block on the NAND flash.
- Write Back: Finally, it writes the modified data back to the block.
This read-modify-erase-write cycle is what causes Write Amplification. If you intended to write 4KB of data, but the SSD ends up having to write 12KB due to this cycle, you’d have a Write Amplification Factor (WAF) of 3.
Impact on SSD
- Reduced Performance: Write Amplification can slow down write operations, affecting the overall performance of the SSD.
- Reduced Lifespan: NAND flash memory has a limited number of Program/Erase (P/E) cycles. Write Amplification increases the number of these cycles, thereby reducing the lifespan of the SSD.
Easy Example to Understand the working of TRIM in SSD
Imagine your SSD is like a big toy box full of building blocks. Each time you save something on your computer, you’re adding more blocks to the toy box. But when you delete something, the blocks don’t actually go away; they just get moved to a different spot in the toy box.
Now, TRIM is like your helpful toy organizer. It tells your toy box which blocks you don’t need anymore. So, the next time you want to add new blocks (or save new things), there’s plenty of space ready and waiting. This makes your toy box (or SSD) work better and last longer!
So, TRIM is like a helper that keeps your toy box neat and makes room for new toys!
Why TRIM is Important for SSDs?
The importance of the TRIM command in the context of SSDs cannot be overstated. Its primary benefits lie in two key areas: write performance and SSD lifespan.
1. Improved Write Performance
In the absence of TRIM, your SSD will be prone to a phenomenon known as write amplification. This occurs when the SSD controller has to read an entire data block into its cache, modify it with the new data, and then write it back. This process consumes more write cycles than necessary, leading to reduced write speeds over time. According to studies, write amplification can increase the write latency by up to 300%, severely impacting the SSD’s performance.
With TRIM enabled, the SSD can directly overwrite blocks that are marked as unused, thereby reducing the need for read-modify-write cycles. This results in faster write operations and minimizes latency. Data from various benchmarks indicate that TRIM-enabled SSDs can improve write performance by up to 45%.
2. Extended SSD Lifespan
NAND flash memory, the storage medium in SSDs, has a finite number of Program/Erase (P/E) cycles. Each P/E cycle slightly degrades the quality of the NAND cells, eventually leading to their failure. TRIM helps reduce the number of unnecessary P/E cycles by allowing the SSD to erase only the blocks that are genuinely unused. According to manufacturer data, enabling TRIM can extend the lifespan of an SSD by up to 30%.
A study conducted by the Storage Networking Industry Association (SNIA) found that SSDs with TRIM enabled had a 20% to 30% longer lifespan compared to those without TRIM. Another benchmark by TechReport showed that write performance was consistently 40% faster when TRIM was enabled, corroborating the importance of this command in real-world scenarios.
Pre-Requisites for Using TRIM
Before diving into the process of enabling and using the TRIM command to optimize your SSD, it’s essential to ensure that your system meets specific requirements. Failing to do so could result in suboptimal performance or even data loss in extreme cases. Here are the key prerequisites:
Compatible SSD
Not all SSDs support the TRIM command. Generally, most modern SSDs come with TRIM support, but older models or budget SSDs may lack this feature. It’s crucial to check the manufacturer’s specifications or use built-in operating system commands to verify TRIM compatibility.
Supported Operating System
The operating system plays a vital role in issuing the TRIM command to the SSD. Here are some OS versions that support TRIM:
- Windows 7 and above
- macOS 10.6.8 (Snow Leopard) and above
- Linux Kernel 2.6.33 and above
File System Compatibility
TRIM is usually supported on specific file systems. For instance, on Windows, NTFS is generally the recommended file system for TRIM support. On macOS, APFS and HFS+ offer TRIM support, while on Linux, ext4, and XFS are commonly used file systems that support TRIM.
Administrative Privileges
Enabling TRIM often requires administrative or root access to execute specific commands or modify system settings. Ensure you have the necessary permissions before attempting to enable TRIM.
Firmware and Driver Support
The SSD’s firmware and the storage controller drivers should also support TRIM. While most modern systems come with this support out-of-the-box, older systems may require a firmware update.
Backup Your Data
Before making any changes related to TRIM, it’s a good practice to back up all essential data. While enabling TRIM is generally a safe operation, there’s always a risk of data loss when modifying disk settings.
How to Enable TRIM on Different Operating Systems?
Enabling TRIM varies depending on the operating system you’re using. Below are step-by-step guides for enabling TRIM on Windows, macOS, and Linux.
Enable Trim in Windows
- Open Command Prompt as Administrator: Search for ‘cmd’ in the Start menu, right-click on it, and choose ‘Run as administrator’.
- Check TRIM Status: Type
fsutil behavior query DisableDeleteNotifyand press Enter. If the result is ‘0’, TRIM is already enabled. If it’s ‘1’, proceed to the next step. - Enable TRIM: Type
fsutil behavior set DisableDeleteNotify 0and press Enter. This will enable TRIM.
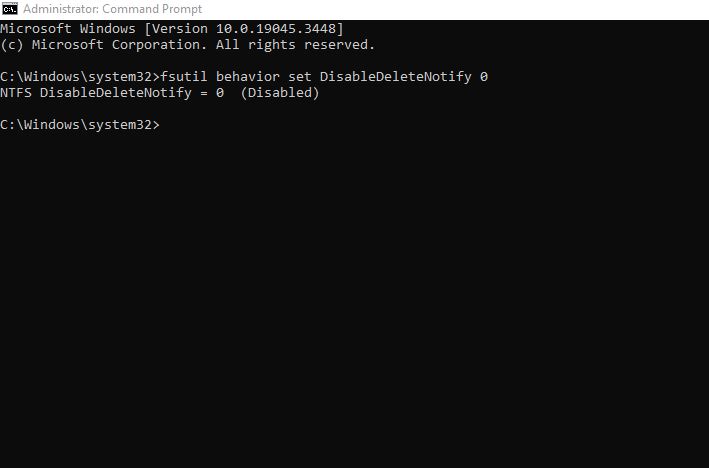
- Verify: Repeat step 2 to ensure that TRIM is enabled.
Enable TRIM in macOS
- Open Terminal: You can find the Terminal application in the Utilities folder within the Applications folder. Alternatively, you can use Spotlight Search (
Cmd + Space) and type “Terminal.” - Type the Command: In the Terminal window, type
sudo trimforce enableand then press Enter. - Enter Password: You’ll be prompted to enter your administrator password. Type it in and press Enter. Note that you won’t see the characters as you type.
- Read the Warning: A warning message will appear, explaining that enabling TRIM may result in data loss under certain conditions. Read it carefully.
- Confirm: To proceed, you’ll need to type ‘y’ for yes when prompted and then press Enter.
- Reboot: After confirming, your system will inform you that it needs to reboot to complete the process. Save any open work, and then type ‘y’ and press Enter to proceed with the reboot.
After your system restarts, TRIM should be enabled. You can verify by going back to Terminal and typing system_profiler SPSerialATADataType | grep 'TRIM'. If it says ‘TRIM Support: Yes,’ then TRIM has been successfully enabled.
Enable TRIM in Linux
- Open Terminal: You can usually open it by pressing
Ctrl+Alt+T. - Check TRIM Status: Type
lsblk --discardand look for the ‘DISC-GRAN’ and ‘DISC-MAX’ columns. If they show values other than ‘0B’, TRIM is supported. - Enable TRIM: For immediate TRIM operation, type
sudo fstrim -v /. For periodic TRIM, you can enable a systemd service by typingsudo systemctl enable fstrim.timerand thensudo systemctl start fstrim.timer. - Verify: To ensure TRIM is active, you can check the systemd timer logs by typing
sudo systemctl status fstrim.timer.
How to Verify TRIM is Active?
After enabling TRIM, it’s crucial to verify that it is active and functioning as expected. The verification process varies depending on your operating system. Below are the steps for each:
Verify TRIM in Windows
- Open Command Prompt as Administrator: Navigate to the Start menu, search for ‘cmd’, right-click on it, and choose ‘Run as administrator’.
- Check TRIM Status: Type
fsutil behavior query DisableDeleteNotifyand press Enter. If the result is ‘0’, TRIM is enabled and active.
Verify TRIM in macOS
- Open Terminal: Locate Terminal in Applications > Utilities or use Spotlight to search for it.
- Check TRIM Status: Type
system_profiler SPSerialATADataType | grep 'TRIM'and press Enter. If the result says ‘TRIM Support: Yes’, TRIM is enabled and active.
Verify TRIM in Linux
- Open Terminal: Usually accessible by pressing
Ctrl+Alt+T. - Check TRIM Status: Type
lsblk --discardand examine the ‘DISC-GRAN’ and ‘DISC-MAX’ columns. If they display values other than ‘0B’, TRIM is active. - Systemd Logs: For those who enabled periodic TRIM through systemd, type
sudo systemctl status fstrim.timerto check the logs. If the timer is active, TRIM is functioning periodically as expected.
Scheduling Regular TRIM Operations
For optimal SSD performance, it’s advisable to schedule regular TRIM operations. This ensures that unused blocks are consistently flagged and cleared, reducing write amplification and extending the SSD’s lifespan. Here’s how to schedule TRIM on various operating systems:
Windows
- Open Task Scheduler: Navigate to the Start menu, search for ‘Task Scheduler’, and open it.
- Create Basic Task: In the right-hand panel, click on ‘Create Basic Task’.
- Name and Description: Provide a name for the task, such as ‘Weekly TRIM’, and optionally add a description.
- Trigger: Choose when you want the task to start. For TRIM, a weekly or monthly schedule is generally sufficient.
- Action: Select ‘Start a program’ and then browse to the location of the Command Prompt executable (
C:\Windows\System32\cmd.exe). - Add Arguments: In the ‘Add arguments’ field, type
/c fsutil behavior set DisableDeleteNotify 0. - Finish: Complete the wizard to create the task. The TRIM operation will now run at the scheduled times.
macOS
- Open Terminal: Locate Terminal in Applications > Utilities or use Spotlight to search for it.
- Edit Crontab: Type
crontab -eto open the cron table for editing. - Add Cron Job: Add a line like
0 3 * * 0 sudo trimforce runto run TRIM every Sunday at 3 AM. - Save and Exit: Save the changes and exit the editor to activate the cron job.
Linux
- Open Terminal: Usually accessible by pressing
Ctrl+Alt+T. - Systemd Timer: For systemd-based distributions, type
sudo systemctl enable fstrim.timerand thensudo systemctl start fstrim.timerto enable and start the timer. - Cron Job: Alternatively, you can use cron by typing
crontab -eand adding a line like0 3 * * 0 sudo fstrim -v /to run TRIM every Sunday at 3 AM.
By setting up these regular TRIM operations, you’re taking a proactive approach to maintaining your SSD’s health and performance.
TRIM On vs TRIM Off: When to use this feature and when not?
| Criteria | TRIM On | TRIM Off |
|---|---|---|
| Write Performance | Improved write speeds due to optimized block management. | Slower write speeds over time due to write amplification. |
| SSD Lifespan | Extended lifespan due to reduced unnecessary write/erase cycles. | Shorter lifespan due to increased number of write/erase cycles. |
| Data Recovery | Difficult or impossible to recover deleted data. | Easier to recover deleted data, but not guaranteed. |
| System Overhead | Minimal system overhead for modern SSDs and operating systems. | No system overhead related to TRIM, but potential for other inefficiencies. |
| Compatibility | Requires SSD and file system that support TRIM. | No special requirements. |
| Data Integrity | Potential risk of data corruption if SSD firmware is not compatible. | Lower risk of data corruption related to TRIM. |
| Garbage Collection | More efficient garbage collection in SSD. | Less efficient garbage collection, leading to reduced performance. |
| RAID Configurations | Possible overhead in RAID setups, but generally minimal for modern hardware. | No TRIM-related overhead in RAID configurations. |
Difference between TRIM and Garbage Collection
| Criteria | TRIM | Garbage Collection |
|---|---|---|
| Purpose | To inform the SSD which data blocks are no longer in use. | To reclaim unused blocks so they can be used for new data. |
| Initiated By | Operating System | SSD Controller |
| Frequency | Can be scheduled or run manually by the user or OS. | Runs automatically in the background, managed by the SSD controller. |
| Impact on Performance | Generally improves write performance by reducing write amplification. | May temporarily reduce performance while it’s actively running. |
| Impact on Lifespan | Extends SSD lifespan by reducing unnecessary writes. | Aims to extend lifespan but can cause additional writes in the process. |
| Data Recovery | Makes data recovery nearly impossible for deleted files. | Does not generally affect data recovery for deleted files. |
| System Compatibility | Requires support from both the SSD and the operating system. | Built into the SSD and does not require OS support. |
| User Control | Users can enable or disable and sometimes schedule TRIM. | Generally runs automatically with no user control. |
What are the Drawbacks of TRIM in SSDs?
While TRIM offers numerous benefits for SSD performance and longevity, it’s not without its drawbacks. Here are some considerations:
Drawback 1: Data Recovery Challenges
One of the most significant drawbacks of TRIM is that it makes data recovery nearly impossible for deleted files. Once the TRIM command has been issued and the SSD’s controller has cleared the blocks, the data is lost permanently. This is different from traditional HDDs, where deleted files can often be recovered.
Drawback 2: Potential for Data Corruption
Though rare, there’s a possibility of data corruption when TRIM is enabled, particularly if the SSD firmware or driver has compatibility issues with the TRIM command. Always ensure that your SSD firmware is up-to-date and that you’ve backed up important data before enabling TRIM.
Drawback 3: Inconsistent Support Across SSDs
Not all SSDs support the TRIM command, especially older models or SSDs from less reputable manufacturers. This inconsistency can create challenges when attempting to enable TRIM, requiring users to check compatibility carefully.
Drawback 4: Overhead in RAID Configurations
In RAID configurations, enabling TRIM can introduce some overhead, as the RAID controller has to process the TRIM commands for multiple drives. This could potentially slow down performance, although the impact is generally minimal for modern hardware.
Drawback 5: Limited File System Support
TRIM is not universally supported across all file systems. While it’s commonly supported on NTFS (Windows), APFS and HFS+ (macOS), and ext4 (Linux), users of less common file systems may find that they cannot enable TRIM.
Common Issues and Troubleshooting
While TRIM is generally a reliable and beneficial feature, users may encounter some issues during its implementation or operation. Here are some common problems and their solutions:
TRIM Not Supported by SSD
- Symptom: The operating system reports that TRIM is not supported.
- Solution: Check the manufacturer’s documentation to confirm if your SSD supports TRIM. If it doesn’t, consider upgrading to a modern SSD that does.
TRIM Disabled After OS Update
- Symptom: TRIM was working before an OS update but is disabled afterward.
- Solution: Re-enable TRIM using the steps outlined in the “How to Enable TRIM” section. OS updates can sometimes revert custom settings.
Performance Degradation
- Symptom: SSD performance drops despite TRIM being enabled.
- Solution: Verify that TRIM is still active. Sometimes, third-party software or specific system configurations can interfere with TRIM operations.
Data Loss or Corruption
- Symptom: Experiencing data loss or corruption after enabling TRIM.
- Solution: This is rare but can happen. Always back up your data before making changes to disk settings. If you experience this issue, disable TRIM and consult the SSD manufacturer for further guidance.
How TRIM Works in Tandem with Garbage Collection
Both these mechanisms are there to optimize your SSD’s performance and often work in tandem for maximum efficiency. The difference is that the TRIM is working on the operating system level telling about the unused data blocks and their deletion. On the other hand, Garbage collection is an SSD controller-level thing that reclaims these unused blocks and uses them for new data.
If there is no TRIM, Garbage collection will work on its own testing all the data blocks as they are being actively used. This will result in an inefficient utilization of the SSD write cycle. As a result, the SSD can degrade and the lifespan can be reduced.
In simple words, TRIM provides garbage collection with a map of which block is safe to erase and which isn’t. This makes the whole process much easier.
By working together, TRIM and Garbage Collection ensure that your SSD operates at peak performance while also extending its useful life.
Thanks for reading!