
HP Omen 15 is one of the very popular gaming laptop series ever launched by HP. All the laptops in this series including HP 15-ce000, 15-en0013dx, and various other are very powerful when it comes to the gaming and other hardcore computing stuff. But, with the time, you may feel the need of upgrade in any system. And HP Omen 15 can be in your list as well.
Mostly, most of the latest laptops in this series have the M.2 PCIe NVMe SSDs pre-installed in them. But, you will see numerous models with mechanical hard drives.
Fortunately, the HP Omen 15 laptop motherboards have support for M.2. Also, the slot got 4 PCIe lanes allocated with the NVMe support. So, you can easily connect any M.2 NVMe SSD in it and have great benefits in terms of data read/write speed.
However, the specifications will vary as per each system and you should confirm them first on the official website or on your user-manual first of all.
Which SSD is suitable for my HP Omen 15 Laptop?
As I have discussed earlier, there are numerous models in the HP Omen 15 laptop series. So, the best way to check the M.2 NVMe support is your user manual. Another step could be checking the power configurations manually or visiting the official HP website. Also, you can get in touch with HP customer support as well.
Do not just buy any SSD (whether M.2 SATA, M.2 NVMe, or SATA 2.5″) without confirming the port and compatibility of your motherboard with these drives. However, most of the HP Omen 15 motherboards have the ability to work with the fastest M.2 drives i.e. M.2 PCIe NVMe SSDs.
The very latest models (i.e. after 2018) of HP Omen 15 like HP 15-ek0000 will have two M.2 PCIe NVMe slots. One slot will be occupied by an SSD already and you can use the second one to upgrade it. So, it’s important to confirm the system specifications and then proceed further.
Note: If you want to clone your OS from the existing hard drive to the new M.2 NVMe SSD drive, do not remove the hard drive right away. Just clone the data to the new drive and then you can remove it from the system. Otherwise, you will have to buy a SATA to USB Cable to move the data. For the cloning process, just go to the bottom section of the article.
Best SSDs for HP Omen 15
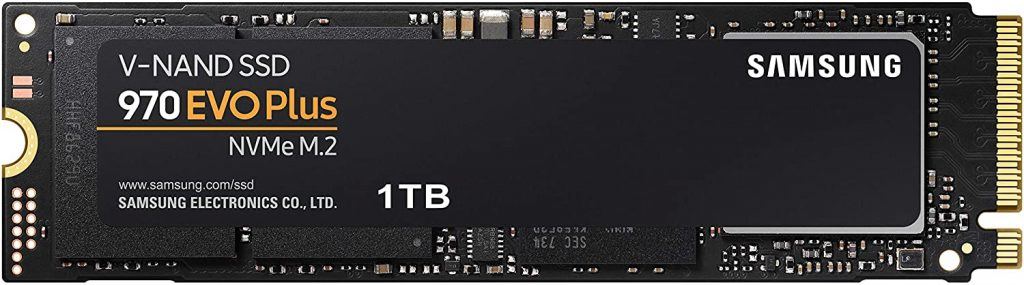
Samsung 970 Evo Plus (Best M.2 NVMe for HP Omen 15)
The Samsung 970 Evo Plus is a perfect option if you want to install an NVMe M.2 SSD. This one comes with a SAMSUNG Phoenix controller and a DRAM. The SSD is available in different capacities ranging from 250 GB to 2 TB.
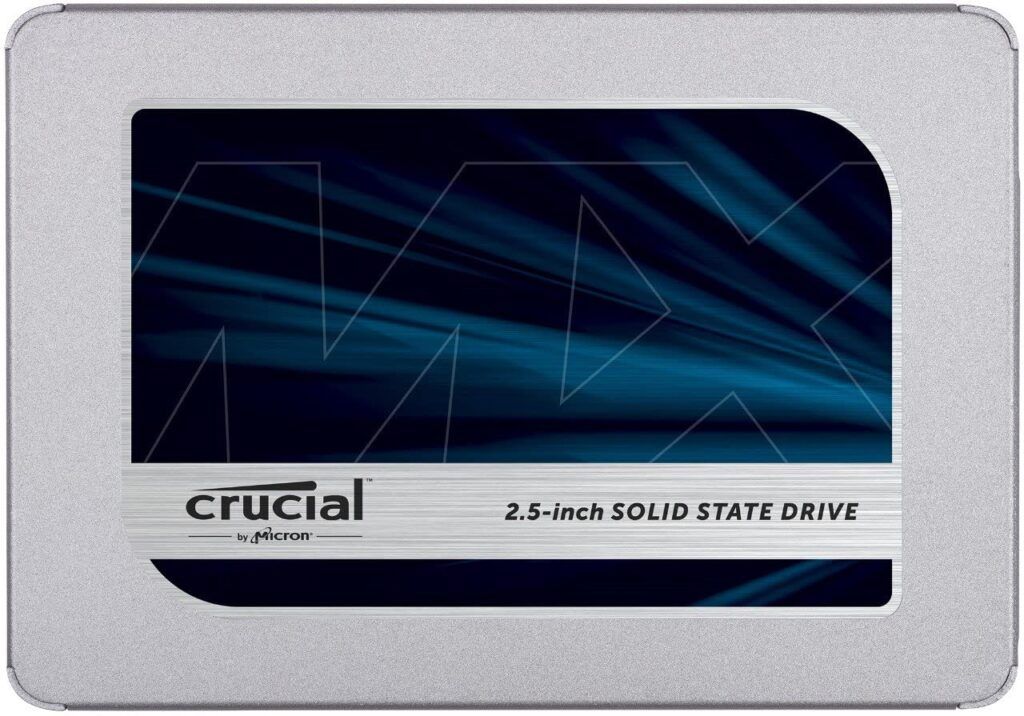
Crucial MX500 (Best SATA 2.5″ for HP Omen 15)
The MX500 is a cheaper option that comes with up to 600MB/s read/write speed. This one is a highly reliable SATA 2.5″ SSD suitable for HP Omen 15 laptops. The SSD is available in various storage capacities ranging from 250GB to 2TB.
Steps to install the SSD in your HP Omen 15 Laptop?
Below are the steps to install a new M.2 SSD in your HP Omen 15 laptop. Also, I will show you how you can replace your hard drive as well with a SATA 2.5″ SSD. So, follow the steps systematically.
1. Disconnect all the cords and start opening the bottom panel screws
The first step is to grab a small screwdriver and start opening the Phillips PM2.0×4.7 screws on the bottom side. Make sure there is no connected wire to your system including the USB cables, LAN Wire, and the power cord.
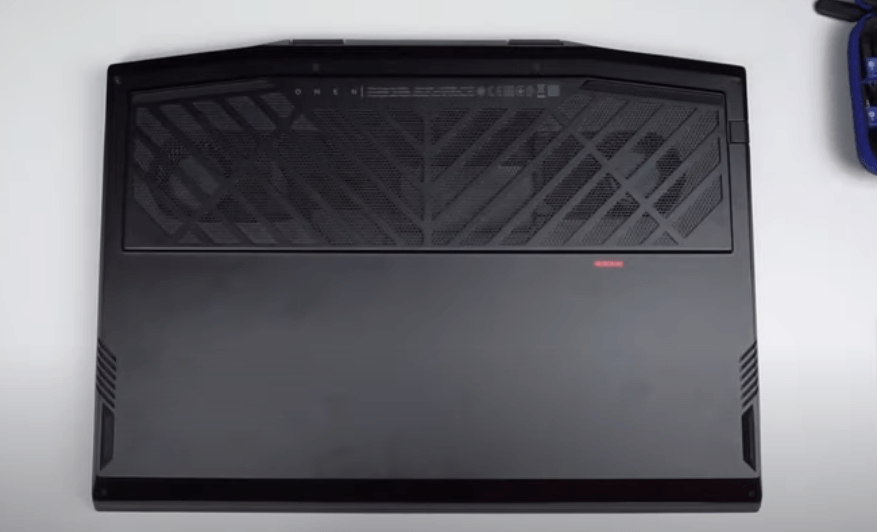
Below are the images of back panels of three different HP Omen 15 models respectively from 2018, 2019, and 2020.
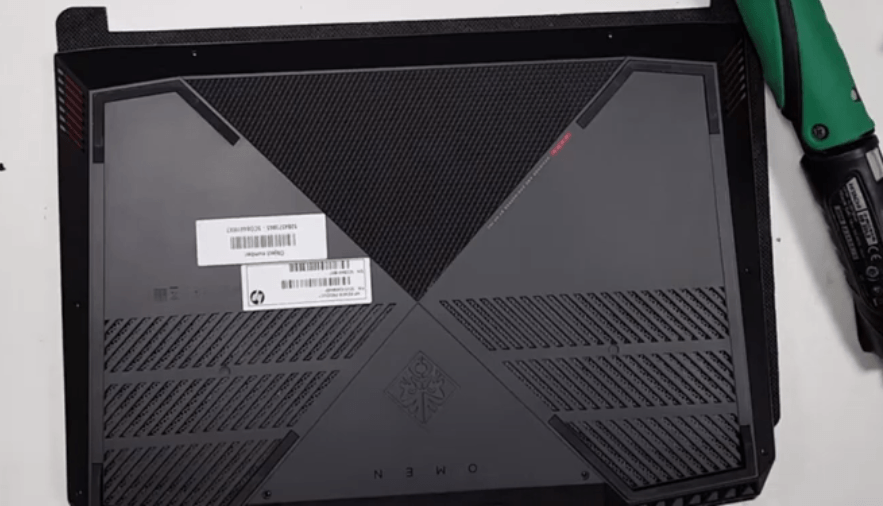
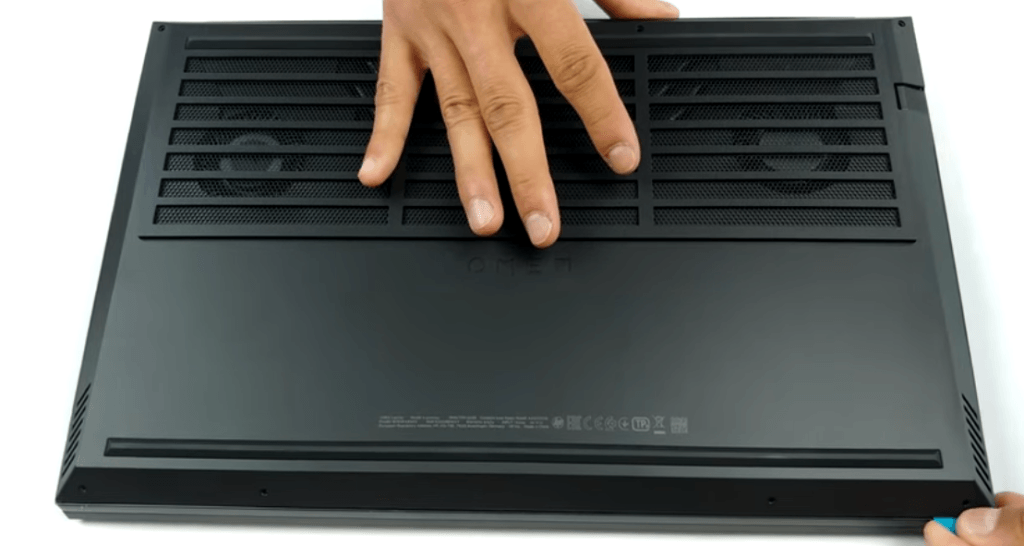
Open all the screws and place them in a safe location. Now, start pulling the back panel out from one side. You can start from the upper side as you can see in the image.
2. Disconnect the battery
All the HP Omen 15 laptops have an internal battery. So, once the bottom panel is opened, you will have to disconnect the battery from the system using its connector cable. After that, press and hold your power button for 5 seconds to purge all the residual power inside the components.
3. SSD Installation and Replacement
3.1 SATA 2.5″ SSD Installation Process
If your HP Omen 15 laptop has a SATA Hard-Drive installed on it, you can replace it with a SATA 2.5″ SSD. For that, locate your HDD and open the screws used to mount it on the body.
Once the hard drive is free, disconnect its connecting wire and free it from the bracket by opening the screws. Now, mount the same bracket on your 2.5″ SATA SSD and fix your SSD at the same place using the main screws. Now, you can connect the SATA Cable.
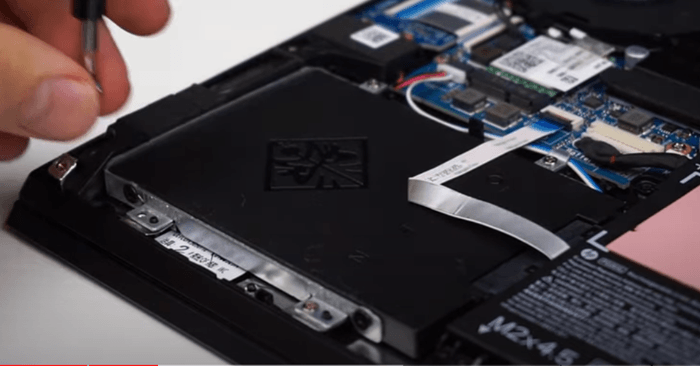
3.2 M.2 SSD Installation Process
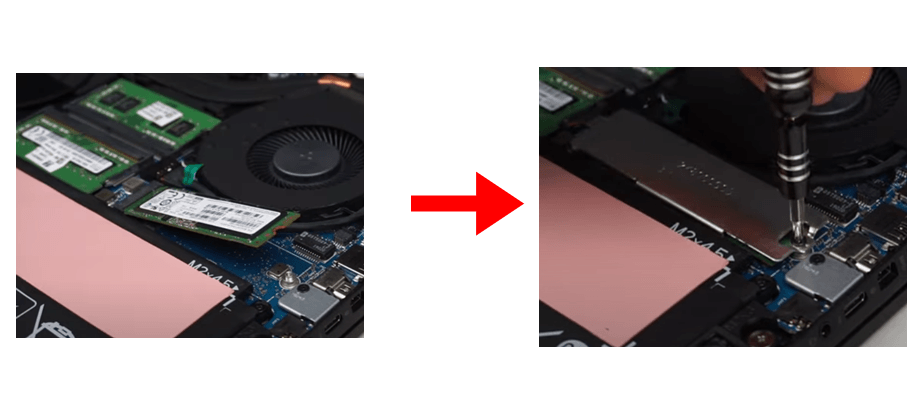
Again, you will see two types of M.2 ports depending on the model of your laptop. The first one will be naked and the second one will have a metallic cover.
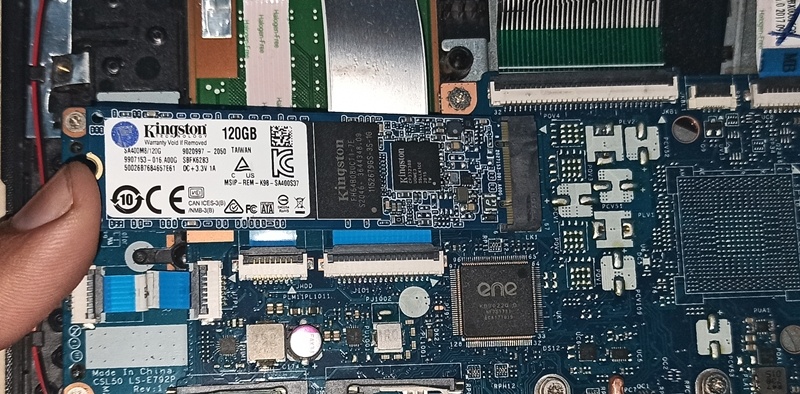
Installing the M.2 SATA or M.2 NVMe SSD in the naked one is very easy. You just insert your SSD in the M.2 port at a 30-degree angle and then push it down to tighten the screw on it. See the image for reference.
The second type of laptop with a metallic cover is also easy to operate. Just open the main screw and get the metallic plate out. See the image below.
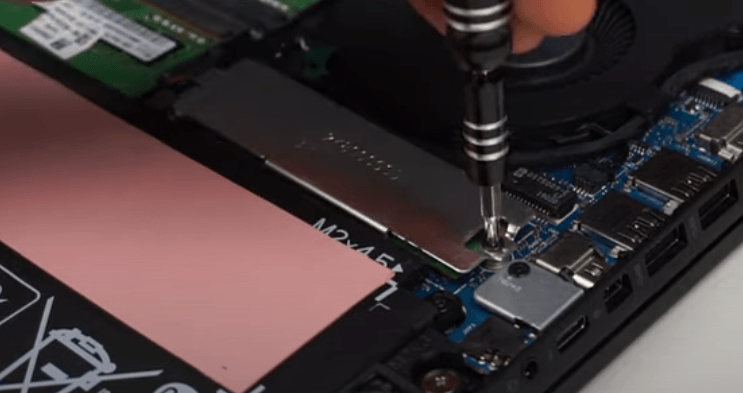
Now, install your SSD into the M.2 port as shown in the image below, and then cover it up with the metallic cover. Push both these things down and tighten the screw as it was earlier.
4. Put the bottom cover and your are done
Now, when the installation is finished, connect the battery cable back to the mainboard and put the cover on the body. Tighten all the screws you have opened and you are done with this process.
If you want to remove all the existing drives from the system and install a new one with the new OS, the article ends here for you. But, if you are interested in cloning your existing OS to the new drive, you can proceed further.
How to move OS from an existing drive to the new one in HP Omen 15 laptop?
Now, if your system already has the M.2 PCIe NVMe drive and you just installed any new drive, you don’t need to move the OS from one drive to another.
But, there could be two more scenarios.
1st Scenario
The first case is when you were having a mechanical hard drive in your system and you just installed an M.2 SATA, 2.5″ SATA, or an M.2 NVMe SSDs which all are faster than the HDD. In this case, you should definitely move your OS to the faster drive to make the most out of it. The system loading time and software opening time will increase only when you are using your SSD for the main storage.
2nd Scenario
The second case could be that you were having a mechanical hard drive in your system which you were using as your OS drive. Now, you have installed an M.2 PCIe NVMe or the SATA 2.5″ SSD and you want to move your OS to it. This is the case when things can become complex. As I have discussed earlier, do not remove your hard disk if you clone your OS from it to the new SSD. Once the OS is cloned, you can think about removing it or just keep it as well for the raw storage.
Step 1: Install the Macrium Reflect Software
Now, if both the target and main drives are installed in your system, you just have to boot your system and install the Macrium Reflect software which offers free features for moving your existing OS to a new drive.
Things to consider
If you have removed your OS drive from the mainboard and only the empty SSD is inside the system, you will need a SATA to USB cable to connect your hard drive to the motherboard first of all. Only then, you can boot from it and proceed with the transfer process with this software.
If you want to boot from the external drive, just open the BIOS by pressing the ESC button while the system is booting up. Then, you can change the boot priority to the external USB drive and proceed to the next step.
Step 2. Mount your SSD
In Windows OS, you will have to mount any newly installed drive before you start using it. For that, just press Windows key+R together to fire up the Run dialog. Enter diskmgmt.msc and hit Enter.
Inside the Disk Management menu, find the SSD and right-click it. Click New Simple Volume and proceed further with the mounting process.

Step 3. Start the cloning process
Open the Macrium Reflect software and it will show you the main OS drive at the top. Below that, you will see Clone this disk option. Click it and checkmark all the drive partitions you want to move to your SSD. If you just want to clone the OS and keep everything as it is on your drive, just checkmark the partitions with the Windows icon on them.
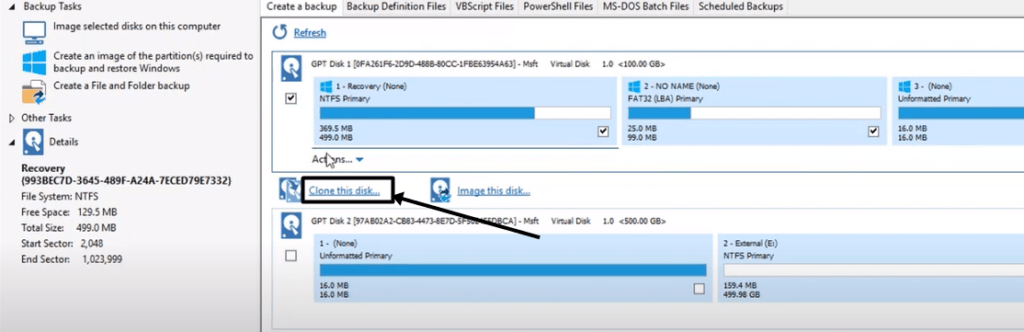
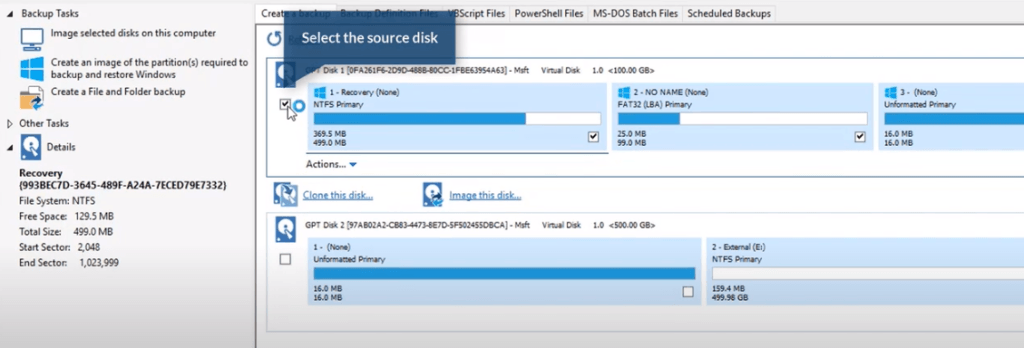
Now, choose the target drive i.e. your SSD, and click Finish. You will be asked for some things. Just proceed further and wait for the process to be finished.
Step 4. Change the boot drive from the BIOS
Now, when the data is cloned to the new SSD. You can boot anytime from your old and new drives. In order to change the boot priority, you will have to enter the BIOS.
Just press Esc while your system is booting up. Inside the BIOS menu, go to System configuration. Now, go to the Boot options and change the boot drive priority using the dedicated buttons. You can search on the internet about this process if you are finding it confusing.
How to do a clean Windows Install in your new SSD?
Below is the process of installing and activating the new Windows in your HP Omen 15 laptop.
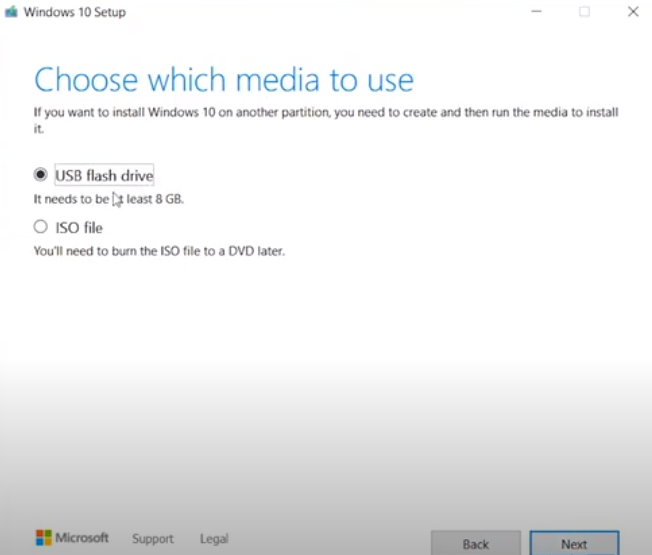
1. Create Windows Media Creation tool
For this process, you will need a pen drive/DVD in which you can make your bootable media drive. Consider having 8GB space at least in your DVD/pen drive. Make sure to format this drive before using it.

Download Windows Media Creation Tool for the Windows version of your interest. The tool is available for Windows 7, 8.1. and 10.
2. Install the Media creation tool on your pen drive/DVD
Once the download is finished, open this tool. Choose the option Create installation media for another PC. Choose the pen drive as your destination drive and let the Windows get downloaded inside it.
3. Enter the BIOS/UEFI and change boot device
Now, enter the BIOS/UEFI and disable Fast Boot and Secure Boot options. Just press F2 multiple times while the system is starting up and you will enter the UEFI.
- Go to the Advance Mode (F7) and go to the Boot tab. Now disable the Fast boot option.
2. Now, go to the Security tab and disable the secure boot Control option.
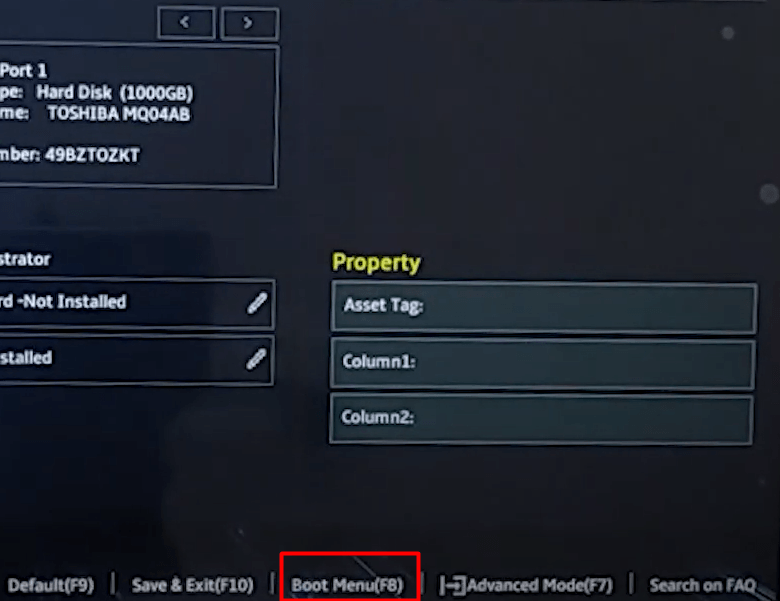
3. Lastly, in order to load your system from the pen drive, go to Boot Menu and select your pen drive or DVD where the Windows is downloaded.
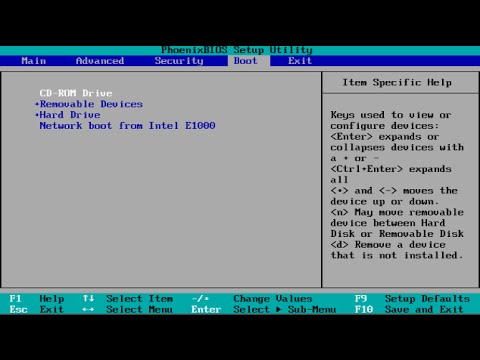
If your laptop is opening with a normal BIOS menu, go to the Boot tab and move the pen drive/DVD to the top to make it your boot drive. See the image below
4. Install and activate the Windows
The Windows Setup will start.
When you reach the menu, Where do you want to install Windows?, just choose your SSD and press Next. (You will probably see unallocated with your SSD). Do drive partitions if required. If not, you can go further, and then the Windows will get installed. Once the installation is finished, you can remove your bootable DVD or Pen Drive.
If you have an activation key, just follow this procedure and activate the Windows.
- Go to Windows Control Panel.
- Click on System and security. Then select System.
- Click “Get more features with a new edition of Windows”.
- Select “I already have a product key”.
- Then enter your product key and click on Next.
For more information on Windows activation, visit this page.
Final Verdict
So, this was all about upgrading your HP Omen 15 laptop SSD and the installation process. If you are not comfortable opening your laptop, just don’t do it and find someone expert. If the laptop is under warranty, consider getting in touch with customer support before opening it. Having any other questions in mind, just get in touch with me anytime.
Thanks for reading!