
SSDs are prone to degradation. And, sometimes this can happen really fast. So, if you are observing this kind of issue with your drive as well, this article might help you.
Because the data is stored in the form of electric charge. These charges are stored inside the Flash cells. When a cell is utilized to store any bit of information, it is called the Program (P) state of the cell. When the information is erased from that cell, it is called the Erase (E) state of the cell. Both combined, you get limited P/E cycles with any cell and hence any SSD.
As time passes and you keep using your drive, the amount of negative charge in the cell increases. This results in less control over the gate voltage. As a result, the process of erasing the cells becomes slower. There are other reasons like oxide layer degradation which we will cover next. I know this is going to be really confusing stuff for most of you. So, I will keep it simple and help you with the actual problem.
The first thing is always to double-check things. I am talking about using different software and system tools to be 100% sure that the health of your drive is in danger.

Why and How does SSDs degrade?
Why SSDs degrade is pretty simple. It is the nature of technology they are based upon. You will have to understand it first.
Let’s understand it with an example.
The NAND cells store data in the form of a charge trap. Imagine it like a small electric current trapped inside a thin wall of di-electric (oxide/insulating) material. There could be no charge there as well. The availability or absence of this charge is determined by checking the voltage levels received from one end (gate) to the second end (channel). If there is a charge, the controller will interpret it as a binary [0]. If there is no charge, the controller will see it as a [1].
When this charge is stored and erased over and over again, the oxide layer within the NAND cells degrades. The process will become faster if the cells are under high temperature constantly as it results in over-excitement of electrons. When that oxide or insulating layer degrades, eventually the whole SSD degrades.
The life of this oxide layer is a calculation on which the TBW of your drive is decided. The size of this di-electric and tunnel-oxide is generally 6-7 nm and 10-13nm. So, it is going to degrade one day or another.
Common symptoms of decreasing SSD health
In my journey, I have noticed that a declining SSD often shows signs such as slower data transfer rates, frequent errors during data transfer, and the system taking a longer time to boot. I have also seen cases where files get corrupted unexpectedly, showcasing a direct impact on the SSD’s health. Here are some of the common signs that have caught my attention:
- Slow read/write speeds: SSDs are loved for their lightning-fast speeds. However, a decrease in the read/write speeds can be a strong indicator of declining health.
- Frequent crashes: If your system starts experiencing frequent crashes, it’s a telltale sign that the SSD’s health is diminishing.
- Bad blocks: Over time, SSDs can develop bad blocks, which are areas that can no longer be written to or read from. It’s a significant indicator that the health of your SSD is on a downward trajectory.
- Strange noises: Although SSDs are silent, in extreme cases of degradation, they might emit strange noises, a phenomenon I have encountered in my explorations.
Reasons behind decreasing SSD health
There are 3 main reasons why your SSD is degrading faster than normal.
Reason 1. Overuse
In the early stages of my exploration into the SSD landscape, I quickly realized that consistently high levels of use can contribute significantly to the decreasing health of an SSD.
Most normal users would never be able to reach those huge TBW numbers in the whole lifetime of their drives. However, there can be some applications where you can surpass the TBW. While reaching those numbers, you can start to experience issues like slow reading or corrupt files.
Reason 2. Inadequate Ventilation/Heat
SSDs may not have moving parts, but they can still generate a substantial amount of heat, especially during intensive operations. This revelation led me to understand the quintessential role proper ventilation plays in maintaining SSD health.
Ensuring proper ventilation prevents overheating, which can result in thermal throttling and can impair SSD performance over time.
Reason 3. Old Firmware
Just like an old operating system can slow down a system, outdated firmware can do the same to an SSD. Firmware is essentially the software embedded in the SSD that controls its operations.
How to check SSD health?
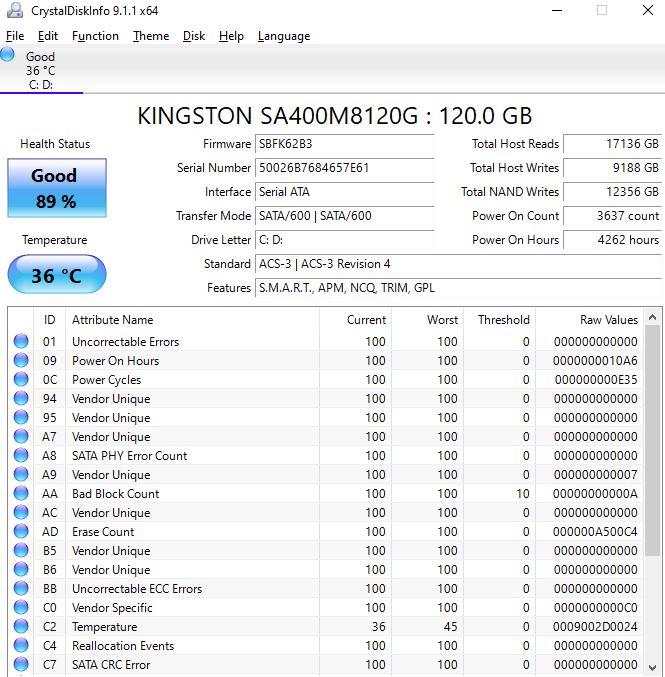
Your SSD manufacturer software will give you the information most of the time. Some of these are Samsung Magician, Kingston SSD Manager, and Crucial Storage Executive. However, you can use third-party software like CrystalDiskInfo, SSDLife, or EaseUS Partition Master.
I personally like the CrystalDiskInfo. It gives you details about the remaining health and the live temperature of your drive.
Below are some of the best tools to access the health of your SSD.
| Tool | Key Features | Compatibility |
|---|---|---|
| CrystalDiskInfo | – Monitors SSD health status – Temperature monitoring – Supports a wide range of SSDs | Windows |
| Samsung Magician | – Firmware updates – Performance optimization – Drive health diagnostics | Windows, limited functionality on Mac |
| SSD Life | – SSD health status – Estimated lifespan calculator – Alerts for potential issues | Windows |
| Smartmontools | – Detailed drive information – Log tracking – Error reporting and analysis | Windows, Linux, MacOS |
| Intel SSD Toolbox | – Firmware updates – Diagnostic scans – Optimization tools | Windows |
| Corsair SSD Toolbox | – Firmware update – Secure wipe – Disk clone | Windows |
| Kingston SSD Manager | – SSD health monitor – Firmware updates – Drive utilization monitor | Windows |
| Toshiba SSD Utility | – SSD performance monitor – Secure erase – Firmware updates | Windows, Linux |
| Western Digital SSD Dashboard | – Drive status – Firmware update – Tools & utilities module | Windows |
If you have an SSD with dedicated SSD management software, it should give you all the information. If not, you can use CrystalDiskInfo for all the drives.
How to check SSD for bad sectors?
Bad sectors are basically groups of cells that are no longer functional. The bad sector can be physical where the actual cells are problematic. Secondly, there could be some software issues called logical bad sectors. You can’t fix the physical bad sectors. But, the software’s bad sectors can be checked and fixed using your system itself.
This is how you check and fix bad sectors in your drive.
- Open Command Prompt in Admin mode
- Type chk dsk and hit Enter

Windows Way to fix software bad sectors:
- Open ‘This PC’ or ‘My Computer.’
- Right-click on the SSD you want to check and select ‘Properties.’
- Go to the ‘Tools’ tab and click on ‘Check’ under the Error checking section.
- The system will then scan the drive for errors and attempt to fix them if any are found.
Keep in mind that bad sectors are different than SSD degradation. It is a fault in the drive whereas degradation is a normal and inevitable process. Even a brand-new drive can have bad sectors due to manufacturing faults.
How to fix degrading SSD health?
Unfortunately, there is no way you can repair those degrading dielectric material which is just 8 or 10 nm wide. If it’s wearing out, it will wear out eventually. However, you can take these steps to increase the life of your drive.
Fix 1. Updating Firmware
An updated firmware not only brings in new features but also fixes bugs and enhances performance, acting as a shield against potential issues that can degrade SSD health. Here is a simple guide to help you update SSD firmware:
- Identify Your SSD Brand and Model: Start by identifying the exact brand and model of your SSD. You can find this information in the device manager on Windows and System Information on Mac.
- Visit the SSD Manufacturer’s Website: Head to the official website of your SSD manufacturer. This is where you will find the latest firmware updates.
- Download the Latest Firmware: Locate and download the latest firmware version for your specific SSD model.
- Backup Your Data: Before you proceed with the update, ensure to backup all vital data to prevent any data loss during the update process.
- Run the Update: Execute the update using the firmware update tool usually provided on the manufacturer’s website. Follow the on-screen instructions to complete the update.
Fix 2. Proper Storage Management
Enhancing SSD lifespan goes hand in hand with efficient storage management. Here are a few tips that can aid in managing your storage efficiently:
- Avoid Filling the SSD to Full Capacity: Maintaining some free space on the SSD allows for better performance and a longer lifespan.
- Regularly Delete Unnecessary Files: Make it a habit to delete files that are not needed anymore to prevent clutter and maintain optimal SSD health.
- Use Storage Sense on Windows: If you are a Windows user, utilizing Storage Sense can help manage storage efficiently by automatically freeing up space when necessary.
Fix 3. Optimizing the Operating System
Setting up the operating system to support SSD health is indeed a pivotal step. Here is some advice to optimize your OS:
- Enable TRIM: Ensure that the TRIM function is enabled as it helps in maintaining the performance of the SSD over time.
- Disable Unnecessary Write Actions: Limiting operations that involve unnecessary writing to the SSD can be a good practice. Disable features like indexing to prolong SSD health.
- Regular System Updates: Keep your system updated to enjoy a smooth and responsive performance, which in turn supports the SSD’s health.
Fix 5. Address and Repair Bad Sectors
The Importance of Addressing Bad Sectors
Bad sectors on an SSD can lead to inefficient data storage and retrieval, causing the drive to work harder than necessary. This increased workload can contribute to heat buildup, exacerbating overheating issues. While SSDs are less prone to bad sectors compared to traditional hard drives because of wear leveling, TRIM, etc., they are not entirely immune.
Addressing and repairing bad sectors can improve the SSD’s efficiency, thereby reducing the risk of overheating. Again, most of the SSD software will give you information about your SSD’s health. But, I am going to give you a method that works for all the drives.
How to Address and Repair Bad Sectors Using DiskGenius?
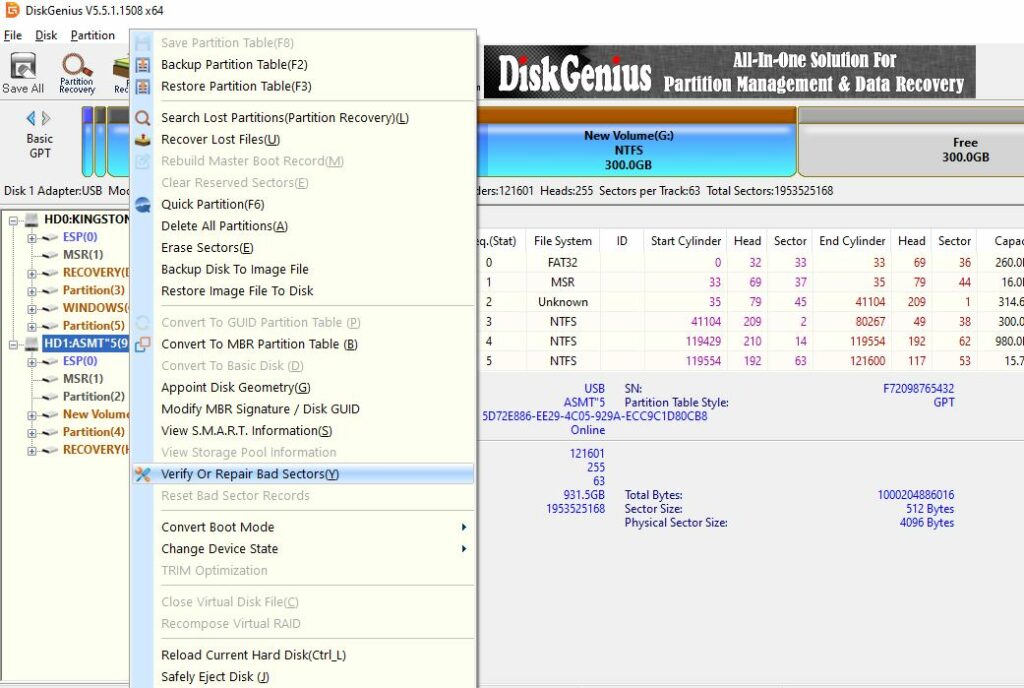
- Download and Install DiskGenius: If you haven’t already, download and install the DiskGenius software. Although there are other software options, DiskGenius is a free tool that is effective for this purpose.
- Launch and Select the Disk: In the DiskGenius interface, locate and select the portable SSD you wish to check for bad sectors.
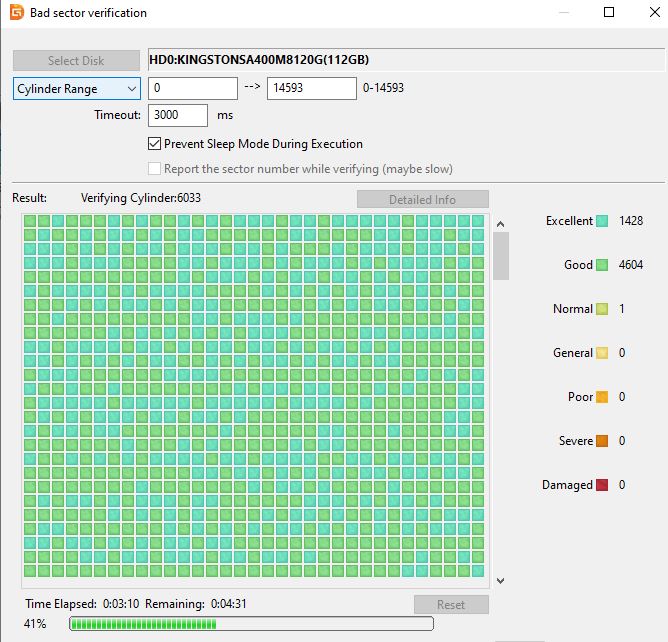
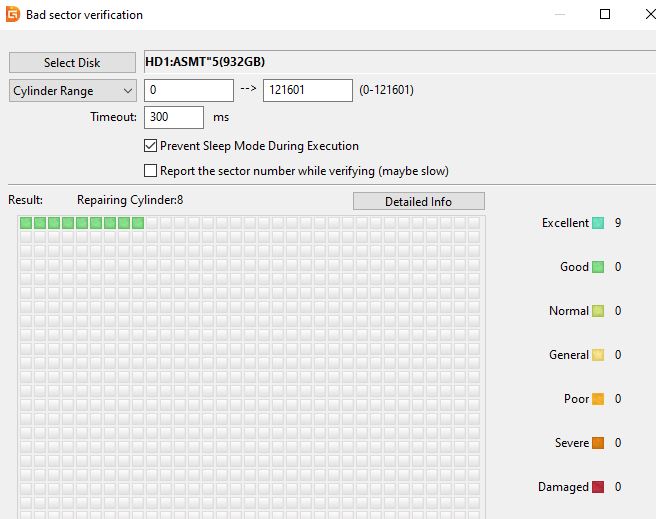
- Start Verification: Once the disk is selected, look for the option to start verification. Click on “Start Verify” to initiate the process. This will scan the drive for any bad sectors.
- Monitor the Scan: As the scan progresses, you’ll see various statuses on the right-hand side of the interface, such as “Excellent,” “Good,” “Normal,” “General,” “Poor,” “Severe,” and “Damaged.” If you see any sectors marked as “Damaged” in deep red, it indicates the presence of bad sectors.
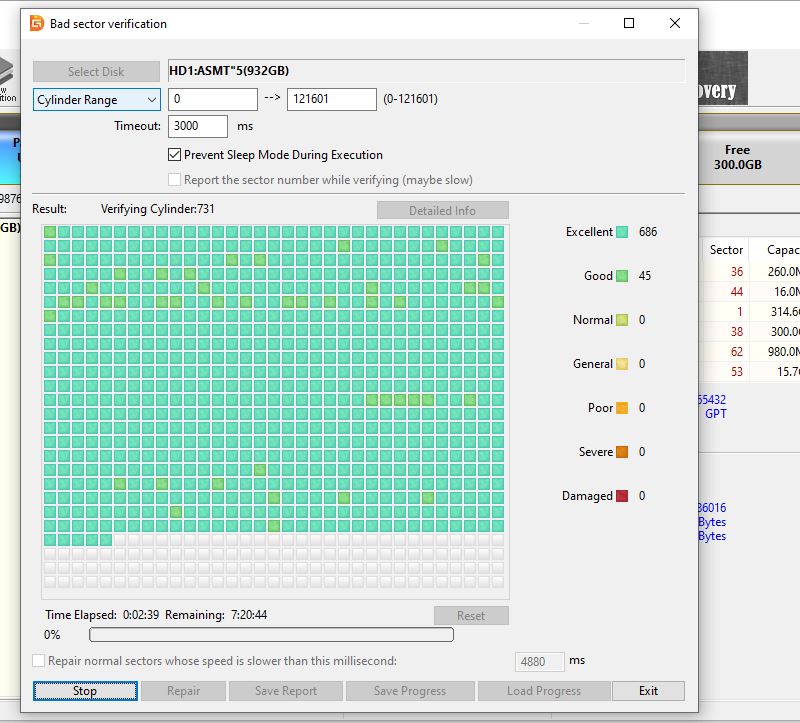
- Run Repairs (Optional): DiskGenius will attempt to repair the bad sectors and move them to a designated “bad sector” area at the end of the drive. This area is marked as unreadable, ensuring that the drive skips over these sectors in future operations. Note that running repairs can take some time.
- Review Results: After the scan and repair are complete, review the results to understand the health of your drive. If you see multiple bad sectors, it may be time to consider replacing the drive.
- Ongoing Monitoring: You can continue to use DiskGenius or similar software to periodically check for bad sectors, especially if you’ve encountered them before.
Fix 5. Secure File Deletion
Understanding and applying the concept of secure file deletion is an essential aspect of SSD maintenance. When you delete a file, it is not completely erased from the SSD, and remnants can still remain. Secure file deletion involves completely erasing the data without leaving any traces. Utilizing tools that offer secure erase options can be a reliable strategy to maintain SSD health. It not only helps in freeing up space but also ensures the data is deleted securely, preventing potential issues arising from data remnants.
Frequently Asked Questions
This really depends on the manufacturer and the type of NAND Flash utilized. However, generally, an SSD will last up to 5-8 years with moderate usage.
SSDs utilize Error-Correcting Code (ECC) to maintain data integrity and correct errors that occur during data storage and retrieval. A sophisticated ECC can detect and fix more errors, potentially prolonging the SSD’s life by reducing the strain on the NAND cells.
It is generally advised to avoid using defragmentation tools on SSDs as they can cause unnecessary wear and tear. SSDs store data differently than HDDs, making defragmentation unnecessary and potentially detrimental to the SSD’s lifespan.
While the BIOS or UEFI might not give detailed insights into SSD health, they can sometimes indicate if an SSD is failing. Signs can include the SSD not being recognized, erratic behaviors, or frequent errors during the boot process. It’s recommended to use specialized SSD monitoring tools for a more accurate assessment of SSD health.
It’s not possible to reverse the SSD damage that happened over time. It is a process that will happen with all the drives.
Conclusion
I hope this article has helped you with the topic. Unfortunately, if your SSD is degrading slowly, it is completely normal. Make sure to have a proper backup if you have important data stored inside it. Keep the things discussed above in mind to safeguard your drive from early failures.
Thanks for reading!