
In this article, we are going to install a new SATA 2.5″ SSD in our Toshiba C55D laptop. But, you can perform the same action in various other C55 and C50 laptop as well. Just see the images below and you will have an idea whether you can perform the same process with your laptop or not.
Doing this process is very easy and you can do it on your own. But, if you are uncomfortable opening your laptop, it is advised to get in touch with an expert to do this work for you.
The Toshiba Satellite laptop series had been discontinued by the company way back in 2016 in the US. But, lots of people still have the laptops in the same series. So, we are going to take a laptop from this series and install the SSD in it. Fortunately, most of the C55 laptops will have the same motherboard configurations. So, you can follow this procedure pretty effectively for any laptop.
Which SSD can you install in your Toshiba Satellite C55?
Most of the Toshiba C55 models including C55T, C55D, and C55DT will have only one SATA port. But, all these slots will have SATA-3 support. So, you can easily have the most out of your SATA 2.5″ SSD.
Unfortunately, the Satellite C55 laptops will not have any M.2 port. Specifically, I am talking about the C55 only models in this article. The laptop models we are including in this article are as follows.
- Satellite C55-A5100
- Satellite C55-A5104
- Satellite C55-A5105
- Satellite C55-A5126
- Satellite C55-A5137
- Satellite C55-A5140
- Satellite C55-A5166
- Satellite C55-A5172
- Satellite C55-A5180
- Satellite C55-A5182
All these models can be equipped with a SATA SSD. Also, if you want, you can make use of an HDD caddy to install another HDD or SSD using your DVD slot.
SSD Installation process in Toshiba C55 laptop
We are going to do everything step by step. So, make sure to follow them systematically.
1. Have a data backup
Although the process of SSD installation is going to very easy, safe, and straightforward. But, there is always a risk of data loss if anything goes wrong. So, if you have stored anything important in your hard drive, make sure to take a data backup before starting the process. You can use any popular data backup software for this.
2. Turn off the laptop and disconnect all the cables
In this step, you just have to turn off your laptop completely. Don’t put it in Sleep. Just press the power button and turn it off.
Now, disconnect any USB along with the power cable from the laptop and proceed to the next step.
3. Remove the battery
The battery is attached to your laptop with the help of two screws. So, pick up a small cross-head screwdriver (preferably Phillips #2) and open two screws as you can see in the image.
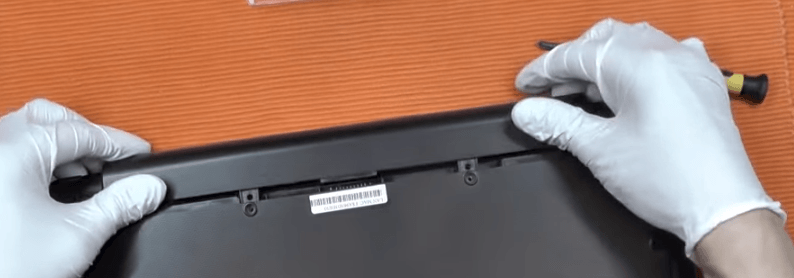
Once the screws are opened, slide the battery back and it will get out.
Once the battery is removed, open the laptop and press and hold the power button for 5 seconds to purge all the residual power inside the components.
4. Open the bottom panel
Start opening all the remaining screws along with the ones with the void seals (if any). Once all the screws are opened, grab your DVD Drive out of the body. Now, start opening the panel from the DVD cavity and take it out.
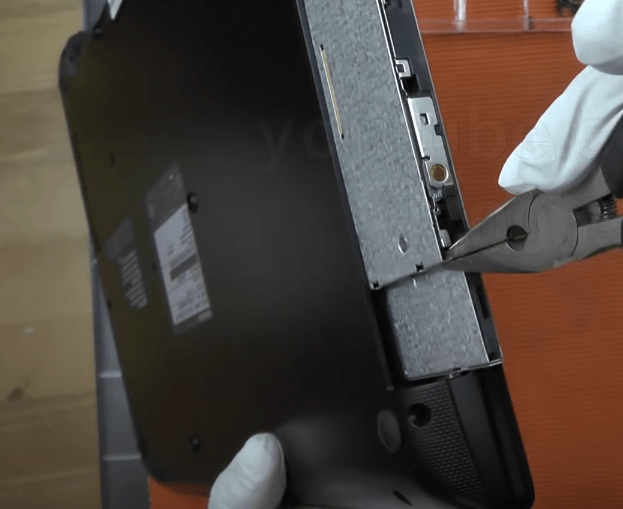
There will be multiple locks that you will have to open. If the laptop is getting opened for the first time, the locks can be pretty tight. Consider using a prying tool and start taking the panel out from one place and then proceed further.
4. Install the SSD
4.1 Install the SSD at the place of your HDD
If you just want to completely remove the HDD and install the new SSD in its place, the process is pretty simple. Just pull your HDD up and get out of its port.
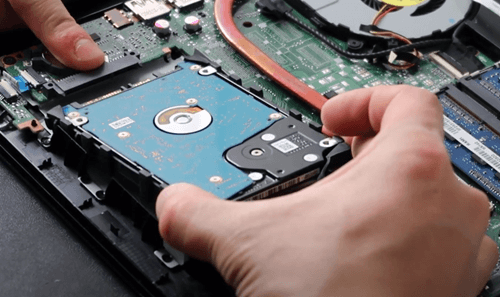
Now, there can be two types of brackets holding your HDD i.e. metallic or rubber caddy. So, if it’s a rubber caddy, just take the HDD out and then detach it from the rubber caddy.
But, if there is a metallic bracket holding it with the body, you will have to untighten the screws and then get your HDD out from it.
Repeat the same process with your SSD. Means, fit your SSD inside this rubber or metallic caddy (bracket) and fit slide it into the port. That’s it.
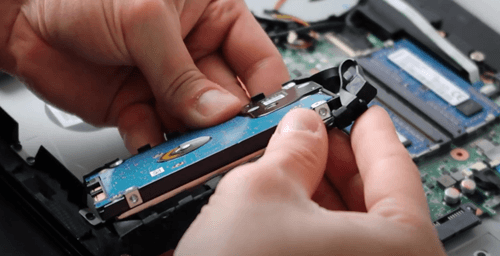
4.2 Install the SSD using the Hard Drive Caddy
The Satellite C55 laptop will easily fit a 9.5mm hard drive caddy at the place of its DVD reader. But, some slim laptops may have a 7.5mm DVD drive as well. So, you will have to buy that caddy for the take.
But, for this one, you can make use of this caddy and easily install a new SSD while keeping your existing hard drive inside the board. However, the installation process of this one can be a little bit tricky. But, I will try to make it easy for you.
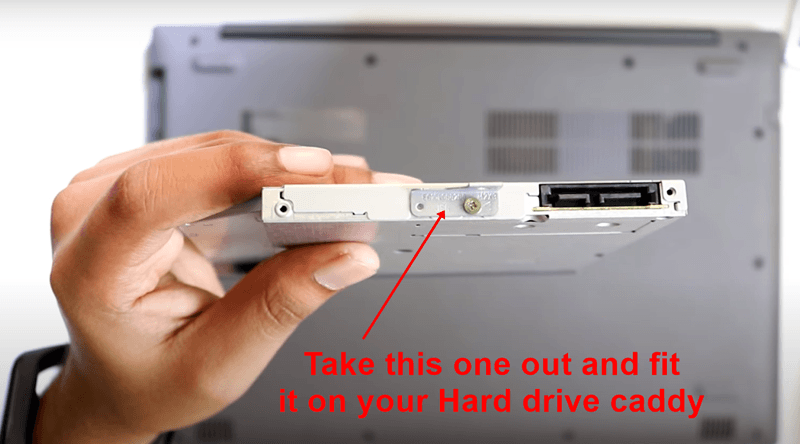
Note: you can easily install the new SSD using a hard drive caddy without having to open the whole bottom panel. Just remove the DVD retaining screw and take your DVD drive out. Then, you can proceed to the steps below.
- Mount your SSD on the caddy using the screws and a screw driver
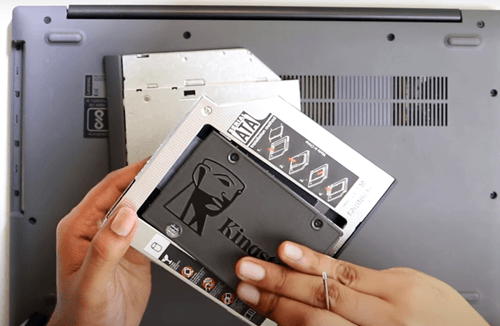
2. On your original DVD caddy, you will see a small metallic strap to hold the caddy on its place with a screw. You will have to install it on your new Caddy. See the image.
3. The next step is to take the outer strap-on out from the DVD caddy and install it on our hard drive caddy.
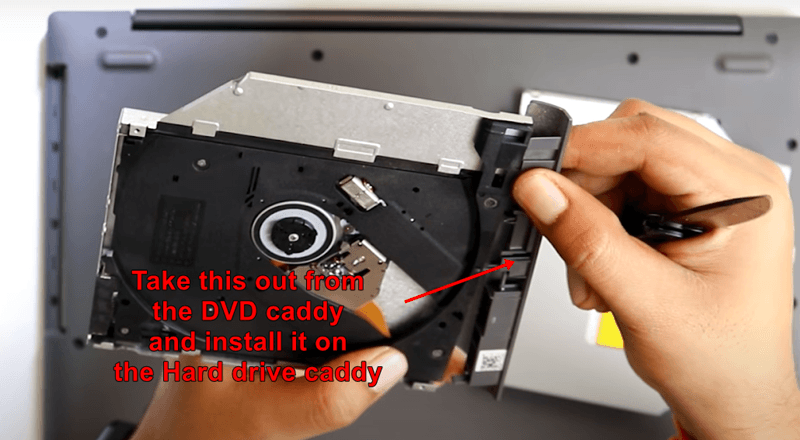
4. The final step is to connect this caddy to your DVD drive port and get it working.

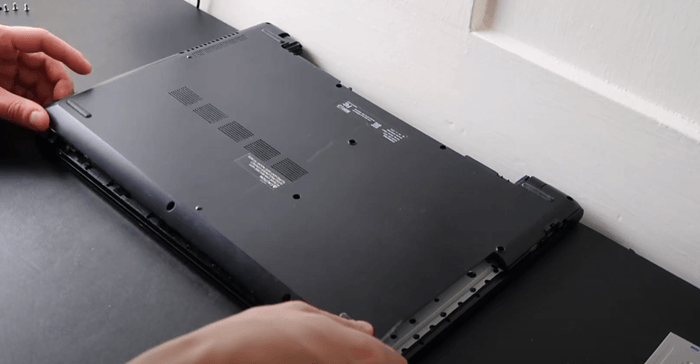
5. Push the bottom cover back and tighten the screws
Once the SSD is installed on the laptop, you just have to fit in the bottom panel and tighten all the screws. After that, you can install your battery and tighten its two dedicated screws as well.
Once done, turn your system On and proceed further.
Do you need to clone your OS or install Windows from scratch?
Well, the answer to this question is very simple. If you have installed any drive faster than what you were using earlier, you should install your OS on that drive. But there can be two different scenarios here with the Satellite C55 laptops.
Case 1: If you have installed an SSD while having your hard drive inside the system, you can easily clone the existing OS to the new drive very easily.
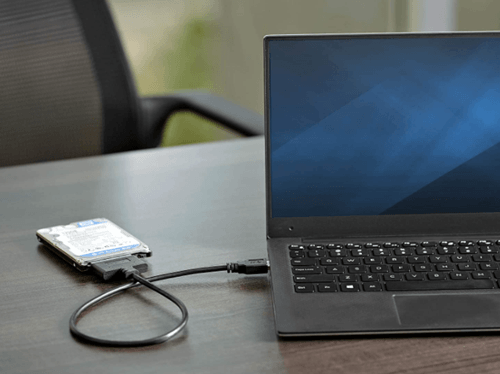
Case 2: If the hard drive with the OS data is out and you just have an SSD inside your laptop, you will have to find a way to connect it with the board in any way. Only then, you will be able to copy your files from the old hard drive to the new SSD. Well, for that, I would suggest you use a good SATA to USB cable.
With this cable, you will connect your hard drive to the system using a USB connection just like the image below.
Now, we are going to discuss both processes i.e. clean Windows installation and Windows cloning.
How to do a clean Windows Install in your new SSD?
1. Create Windows Media Creation tool
For this process, you will need a pen drive/DVD in which you can make your bootable media drive. Consider having 8GB space at least in your DVD/pen drive. Make sure to format this drive before using it.

Download Windows Media Creation Tool for the Windows version of your interest. The tool is available for Windows 7, 8.1. and 10.
2. Install the Media creation tool on your pen drive/DVD
Once the download is finished, open this tool. Choose the pen drive as your destination drive and let the Windows get downloaded inside it.
3. Enter the BIOS/UEFI and change boot device
Now, enter the BIOS/UEFI and disable Fast Boot and Secure Boot options. Just press F2 multiple times while the system is starting up and you will enter the UEFI.
- Go to the Advance Mode (F7) and go to the Boot tab. Now disable the Fast boot option.
2. Now, go to the Security tab and disable the secure boot Control option.
3. Lastly, in order to load your system from the pen drive, go to Boot Menu and select your pen drive or DVD where the Windows is downloaded.
4. Install and activate the Windows
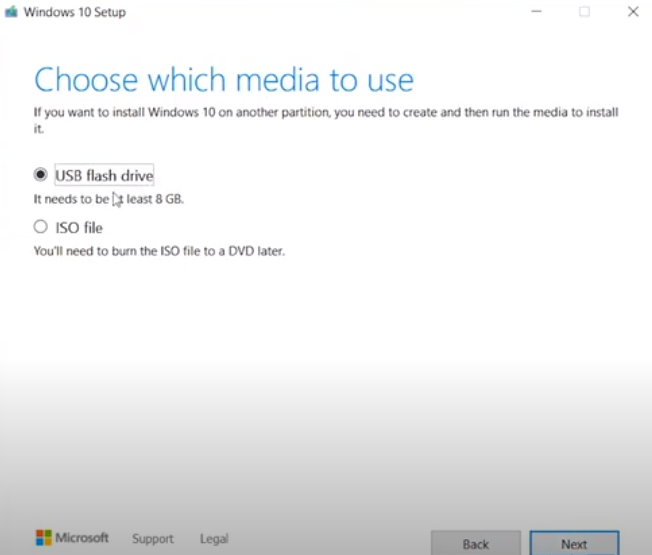
The Windows Setup will start.
When you reach the menu, Where do you want to install Windows?, just choose your SSD and press Next. (You will probably see unallocated with your SSD).
If you have an activation key, just follow this procedure and activate the Windows.
- Go to Windows Control Panel.
- Click on System and security. Then select System.
- Click “Get more features with a new edition of Windows”.
- Select “I already have a product key”.
- Then enter your product key and click on Next.
For more information on Windows activation, visit this page.
How to clone your Windows OS from HDD to SSD?
I have discussed the same thing in various other articles on this blog. But, I am going to help you with the same again this one as well. So, let’s start.
1. Boot your system from hard drive externally
Note: As we discussed earlier, if both the original and target drives are inside the laptop, you don’t need any cable to connect. Just proceed to the next step.
If you have removed your existing hard drive where the actual OS was stored, you will need that drive again. So, for that, you will need a SATA to USB cord. Just connect its SATA side to your hard drive and the USB side to your laptop’s USB port (Preferably USB 3.0 or any latest).
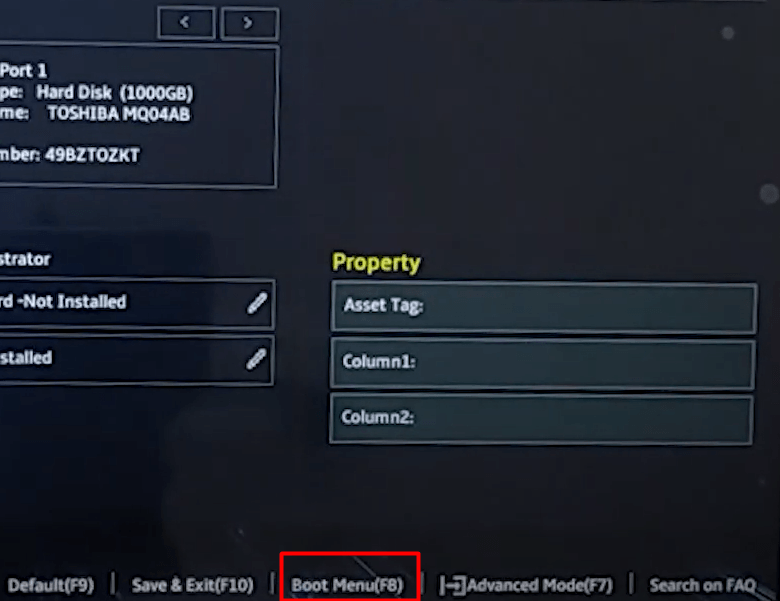
Now, once the hard drive is connected to the system and the SSD is also inside the laptop, we can start the process. So, the first step will be to enter the BIOS and boot your system from the hard drive once again.
Just press the F2 button (may vary depending on the laptop model) while your system is booting up and you will enter the BIOS. Follow the 3rd step in the above guide and change your boot drive to the external SATA. (You just have to change your boot drive and set the hard drive there)
2. Mount the SSD (If Required)
If your system has recognized the newly installed SSD, just skip this step and go to the next one. But, if not, make sure to mount it first,
In Windows systems, it is required to mount your new drive and create its partitions if you want. Without mounting the new drive, your system will not recognize it for anything.
So, just follow this process to mount your SSD.
- Press Windows key+R to open the Run dialog
- Inside Run, type diskmgmt.msc and hit Enter
- Now, right-click on your SSD (Unallocated) and hit New Simple Volume or Initialize Disk

- Now, you can make partitions if you want, otherwise, just proceed with Yes for all the dialog boxes.
3. Install the Macrium Reflect Software and clone your OS
Go to this link and install the Free Macrium Reflect Software which will help you clone all your OS and other data to your new drive. Once the software is fired, you will see your OS drive and the SSD drive below it. Make sure to check the box given with the source disk.
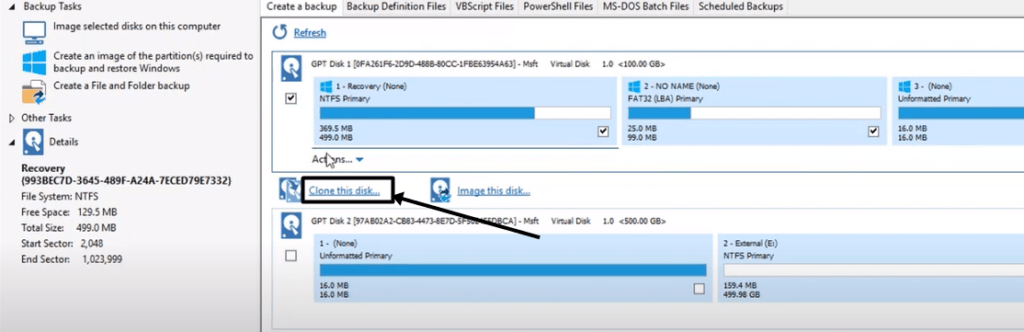
Just press Clone this disk and in the next dialog, select your SSD where you see select a disk to clone to.
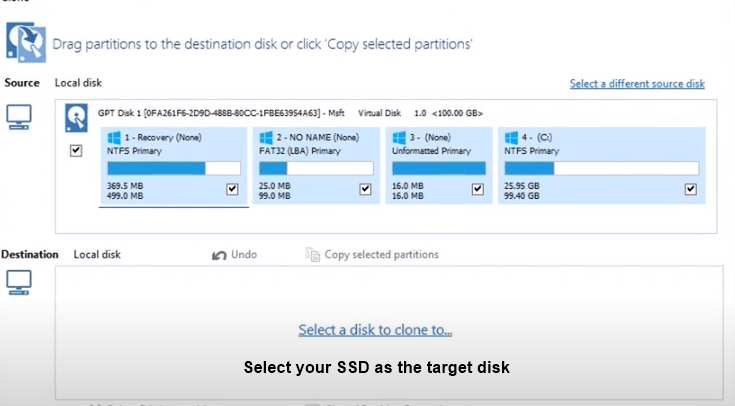
Now, if you want to clone the entire disk, just click copy selected partitions. If you just want to move the OS, drag and drop the volumes which have the Windows icon with them.
Click finish and wait for the cloning process to finish. See this video for better understanding.
4. Change the Boot priority again to your SSD
Once the cloning is finished, your SSD is ready to be used as your OS and storage drive. In fact, both of your drives have OS files and you can use anyone to boot your system from. But, you will now have to enter your BIOS again and change your boot priority to the SSD and that’s it.
If you are confused with the BIOS, just watch a YouTube video like this and you will have everything cleared.
Read this as well
I hope you will find this article helpful. If so, consider sharing this. Get in touch with me if you face any problem with the same.
Thanks for reading!