
Overheating is a pervasive issue that plagues portable Solid State Drives (SSDs), affecting not just their performance but also their longevity. When an SSD overheats, it can lead to slower data transfer rates, increased error rates, and in extreme cases, permanent data loss.
Given the critical role that SSDs play in data storage and retrieval, maintaining an optimal operating temperature is paramount. People often store their important information in these drives such as content creators and their video/audio/image files.
A heating portable SSD is normal until and unless it reaches its limits. But, what are the limits?
Here’s a general guideline for interpreting SSD temperatures:
- Below 40°C (104°F) Normal: This is the ideal operating temperature for most SSDs. At this range, the SSD performs optimally and is far from any risk of thermal throttling or damage.
- 40°C to 50°C (104°F to 122°F) Normal: This is still an acceptable range for most SSDs, but it’s advisable to monitor the temperature to ensure it doesn’t climb higher.
- 50°C to 60°C (122°F to 140°F) Cautionary: While many SSDs can technically operate at these temperatures, you’re getting closer to the upper limit, and the risk of thermal throttling or long-term damage increases.
- Above 60°C (140°F) Dangerous: This is generally considered a high-temperature range for SSDs and should be avoided. Prolonged exposure to temperatures this high can lead to performance degradation and even permanent damage.
In this article, I will delve into the root causes of SSD overheating and present eight effective fixes to mitigate this problem.
Although the article will talk about portable SSDs, you can apply the same methods for portable hard drives.
Common Factors contributing to External SSD overheating
| Factor | Description | Severity Level | Solutions |
|---|---|---|---|
| Poor Ventilation | Lack of airflow around the SSD | High | Improve airflow |
| High Workload | Constant high-intensity read and write operations | Medium | Manage workload |
| Outdated Firmware | Older, non-optimized firmware | Medium | Update firmware |
| Enclosure Design | Poorly designed enclosures that trap heat | High | Choose better enclosure |
| Ambient Temperature | High room or environmental temperature | Medium | Control room temperature |
| Software Issues | Software causing the SSD to work harder than necessary | Low | Update or change software |
How to fix Portable/External HDD and SSD? (Infographic)
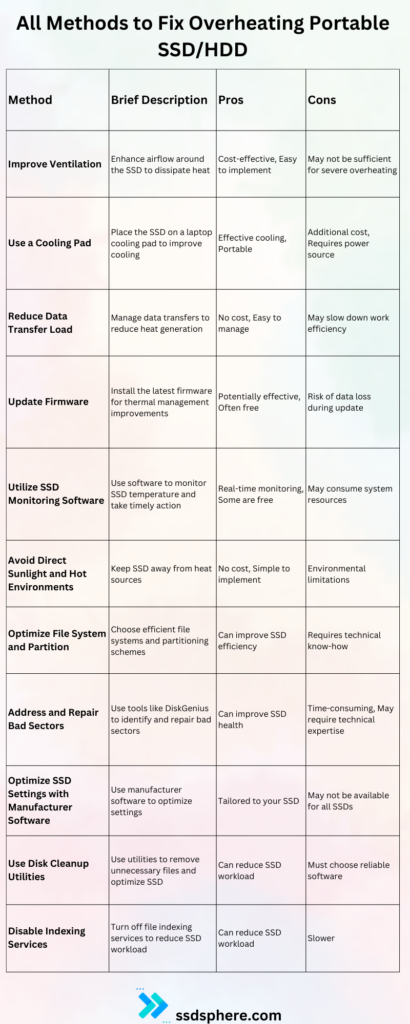
8 Ways to Fix Overheating Portable/External HDD or SSD
Let’s talk about some of the things you can do in order to fix your overheating SSD and HDD. Make sure to write the FAQs at the end of the article. I have answered some popular questions there as well.
Fix 1: Optimal Placement
The Importance of Optimal Placement
One of the most straightforward yet effective ways to combat overheating in portable SSDs is to ensure their optimal placement. The way you position your SSD can significantly impact its ability to dissipate heat.

Proper placement facilitates better airflow around the device, which is crucial for maintaining an optimal operating temperature. When an SSD operates within its ideal temperature range, it is less likely to experience issues such as thermal throttling, data corruption, or even permanent damage. Therefore, optimal placement is not just a preventive measure; it’s an essential aspect of SSD care and data retention.
How to Achieve Optimal Placement?
- Flat, Hard Surface: Place the portable SSD on a flat, hard surface like a desk or a table. This allows for maximum surface area exposure, aiding in heat dissipation.
- Distance from Other Devices: Keep the SSD at least a few inches away from other heat-generating devices like laptops or desktops. This prevents additional heat from affecting the SSD.
- Avoid Soft Surfaces: Soft surfaces like beds, sofas, or cushions can obstruct airflow and should be avoided. These surfaces can act like insulators, trapping heat around the SSD.
- Vertical Orientation: If possible, keep the SSD in a vertical orientation. This allows heat to rise away from the device, although the effect may be minimal for smaller devices like portable SSDs.
- Air Circulation: Ensure that the room or area where the SSD is placed has good air circulation. Use a room fan if necessary to improve airflow in the environment.
By paying attention to these placement guidelines, you can significantly improve the airflow around your portable SSD. While it may seem like a simple fix, the impact on the SSD’s performance and lifespan can be substantial. However, some other solutions are coming ahead.
Fix 2: Use a Laptop Cooling Pad
The Importance of Using a Laptop Cooling Pad
A cooling pad can be a valuable asset in your arsenal against SSD overheating. These devices are generally designed for laptops but can be effectively used for portable SSDs as well. A cooling pad provides additional airflow, enhancing the SSD’s built-in thermal management capabilities.
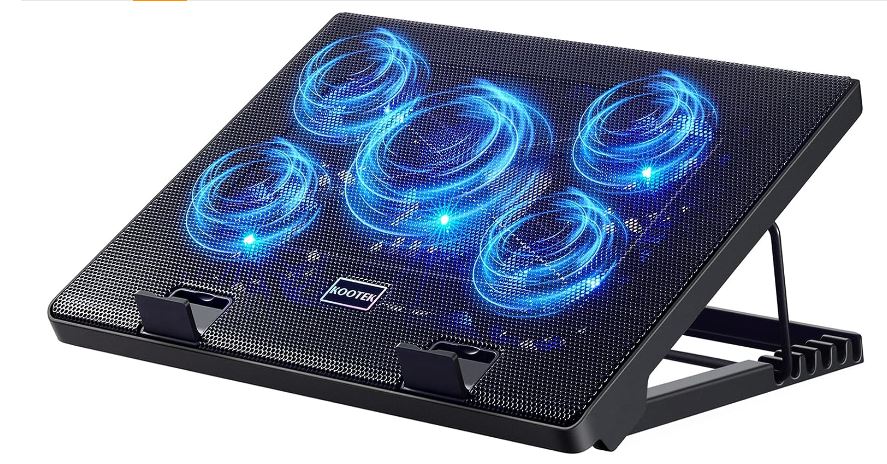
The fans in the cooling pad help circulate air around the SSD, aiding in quicker heat dissipation. This is particularly useful during high data transfer loads or when the SSD is used in warmer environments. By lowering the SSD’s operating temperature, a cooling pad can improve its performance and extend its lifespan.
There are several brands such as Thermaltake and CoolerMaster offering this cooling pages at cheap prices. You can check any of these out.
How to Use a Laptop Cooling Pad with a Portable SSD?
- Select the Right Cooling Pad: Choose a cooling pad that is compact yet powerful enough to provide adequate airflow. Make sure it can be powered through a USB port or has its own power source. CoolerMaster and ThermalTake are some of the popular brands.
- Position the SSD: Place the portable SSD on the cooling pad in a manner that allows for maximum contact with the pad’s surface. This ensures that the cooling pad can effectively draw heat away from the SSD.
- Power Up the Cooling Pad: Plug the cooling pad into a power source. If it’s USB-powered, you can connect it to a laptop or a USB wall adapter.
- Check Fan Operation: Ensure that the cooling pad’s fans are operational. Some cooling pads come with adjustable fan speeds, so set it to a level that effectively cools the SSD without being too noisy or disruptive.
For the users whose work include heavy data read/write operations on the portable or external drives, these cooling pads are great investments. Additionally, you can use them for other devices like camera, phones, tablets, laptops, and smartphones.
Fix 3: Address and Repair Bad Sectors
The Importance of Addressing Bad Sectors
Bad sectors on an SSD can lead to inefficient data storage and retrieval, causing the drive to work harder than necessary. This increased workload can contribute to heat buildup, exacerbating overheating issues. While SSDs are less prone to bad sectors compared to traditional hard drives because of wear leveling, TRIM, etc., they are not entirely immune.
Addressing and repairing bad sectors can improve the SSD’s efficiency, thereby reducing the risk of overheating. Again, most of the SSD software will give you information about your SSD’s health. But, I am going to give you a method that works for all the drives.
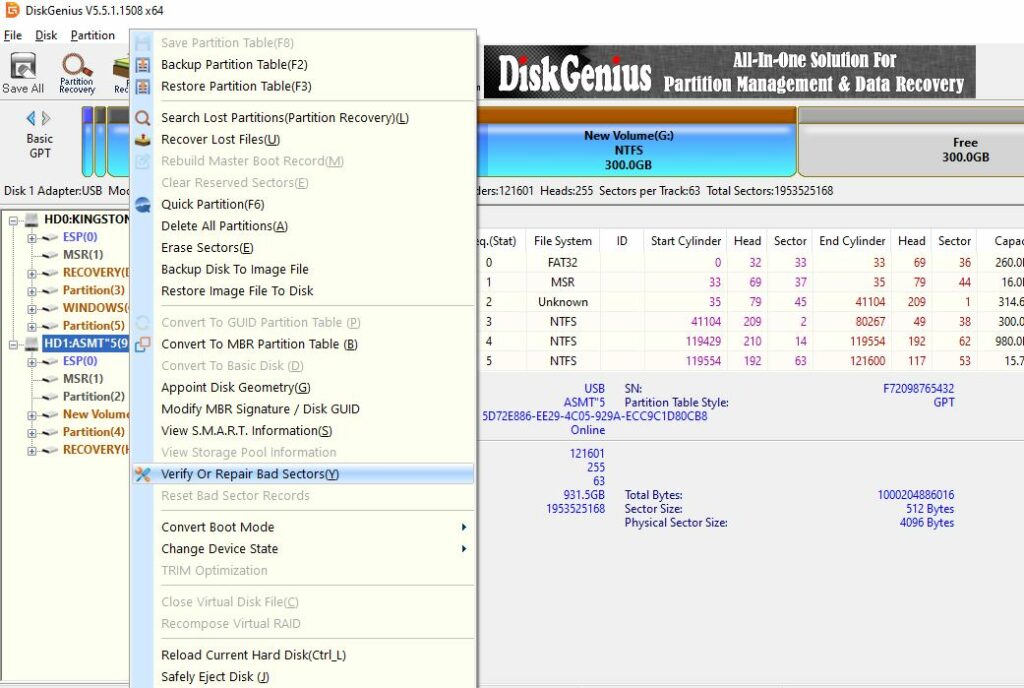
How to Address and Repair Bad Sectors using DiskGenius?
- Download and Install DiskGenius: If you haven’t already, download and install the DiskGenius software. Although there are other software options, DiskGenius is a free tool that is effective for this purpose.
- Launch and Select the Disk: In the DiskGenius interface, locate and select the portable SSD you wish to check for bad sectors.
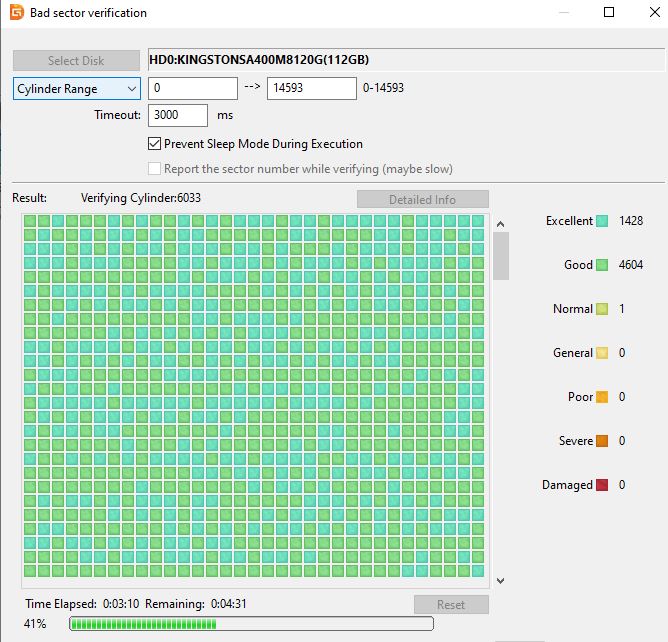
- Start Verification: Once the disk is selected, look for the option to start verification. Click on “Start Verify” to initiate the process. This will scan the drive for any bad sectors.
- Monitor the Scan: As the scan progresses, you’ll see various statuses on the right-hand side of the interface, such as “Excellent,” “Good,” “Normal,” “General,” “Poor,” “Severe,” and “Damaged.” If you see any sectors marked as “Damaged” in deep red, it indicates the presence of bad sectors.
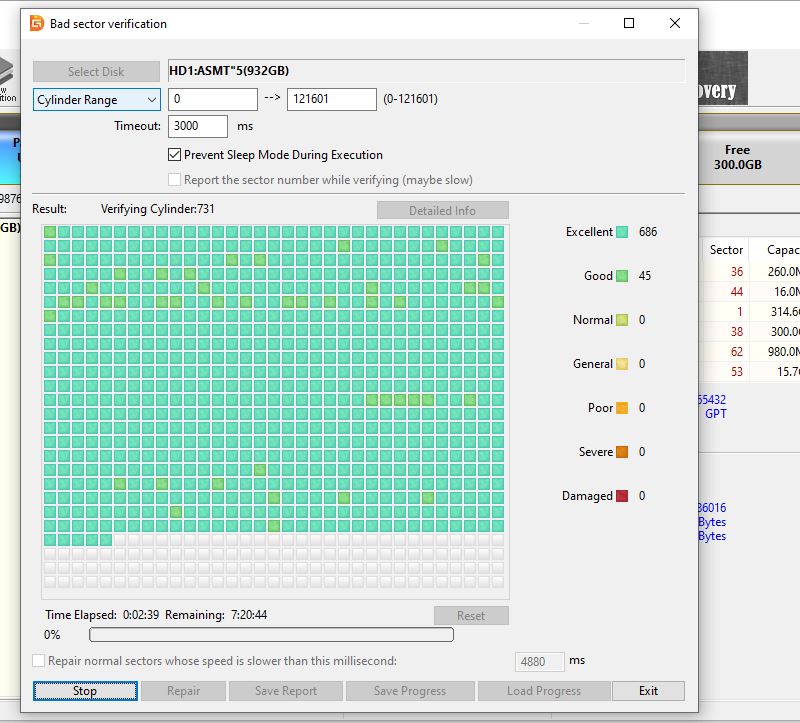
- Run Repairs (Optional): DiskGenius will attempt to repair the bad sectors and move them to a designated “bad sector” area at the end of the drive. This area is marked as unreadable, ensuring that the drive skips over these sectors in future operations. Note that running repairs can take some time.
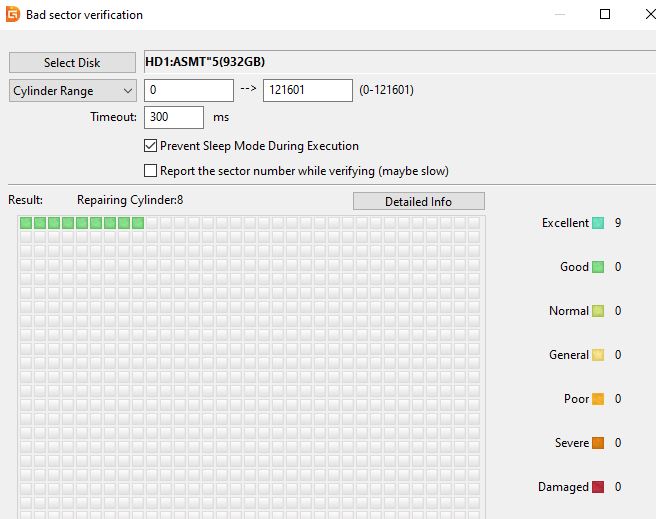
- Review Results: After the scan and repair are complete, review the results to understand the health of your drive. If you see multiple bad sectors, it may be time to consider replacing the drive.
- Ongoing Monitoring: You can continue to use DiskGenius or similar software to periodically check for bad sectors, especially if you’ve encountered them before.
By addressing bad sectors, you’re not just improving the SSD’s data management efficiency but also reducing the strain on its components. This can be a significant step in preventing overheating and ensuring the longevity of your portable SSD.
Fix 4: Use Disk Cleanup Utilities
The Importance of Using Disk Cleanup Utilities
Disk cleanup utilities serve a dual purpose: they not only free up valuable storage space but also optimize the file structure on your SSD. By removing unnecessary files and optimizing how data is stored, these utilities can reduce the workload on the SSD.
A reduced workload means fewer read and write operations, which in turn leads to less heat generation. This can be particularly beneficial if you’re facing overheating issues, as it offers a software-based approach to managing the SSD’s temperature.
How to Use Disk Cleanup Utilities?
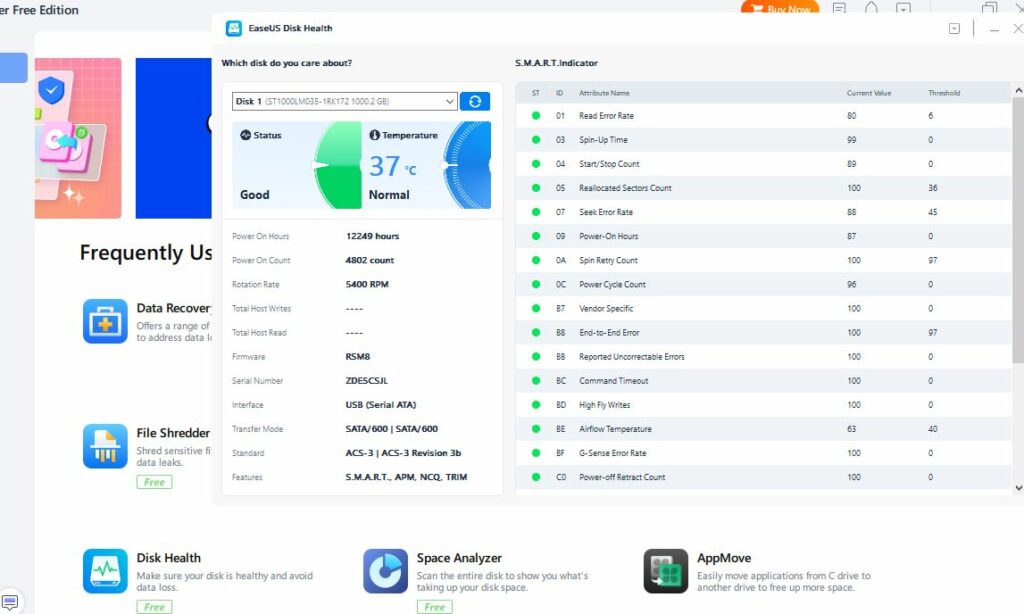
- Choose a Disk Cleanup Utility: The first step is to select a suitable disk cleanup utility. You can opt for built-in options like Windows Disk Cleanup or third-party utilities that offer more advanced features. Some popular third-party utilities include CCleaner, EaseUS Partition Master, and Wise Disk Cleaner. Make sure to choose a reliable and well-reviewed utility to ensure it won’t cause additional issues.
- Install and Launch the Utility: After downloading your chosen utility, follow the installation instructions. Once installed, launch the application and navigate to the section where you can select the drive you wish to clean.
- Select the SSD for Cleanup: In the utility interface, locate and select your portable SSD as the target for the cleanup process. This ensures that the cleanup operations will focus on the SSD and not other drives.
- Select Cleanup Options: Most utilities offer a range of cleanup options, such as removing temporary files, system cache, or browser history. Choose the types of files you wish to remove. The more unnecessary files you can eliminate, the less work the SSD has to do, which can help in reducing heat.
- Execute and Monitor: After selecting the cleanup options, initiate the cleanup process. The utility will remove the selected files and may also perform other optimizations like defragmenting the SSD (although note that defragmentation is generally not recommended for SSDs).
- Monitor SSD Temperature: Once the cleanup is complete, use SSD monitoring software to check if the SSD’s temperature has decreased. This will help you gauge the effectiveness of the disk cleanup in managing heat.
By using disk cleanup utilities, you can effectively reduce the operational strain on your portable SSD, which can lead to a reduction in heat generation. It’s a simple yet effective method that complements other heat management strategies.
Fix 5: Disable Indexing Services
The Importance of Disabling Indexing Services
Indexing services are designed to make file searching faster and more efficient. While this feature is useful, it can put a constant strain on your SSD. The service works by continuously scanning and cataloging files, which involves a lot of reads and write operations.
These operations can contribute to heat generation, especially if the SSD is already under a heavy workload. Disabling indexing services can, therefore, reduce the SSD’s workload and subsequently its heat output. This makes it a valuable method for managing SSD temperature, particularly for those who don’t rely heavily on rapid file searching.
How to Disable Indexing Services?
- Access Indexing Settings on Windows: If you’re using a Windows operating system, go to the Start menu and type “Indexing Options,” then click on it to open the settings. For macOS users, navigate to “System Preferences” and then go to “Spotlight.”
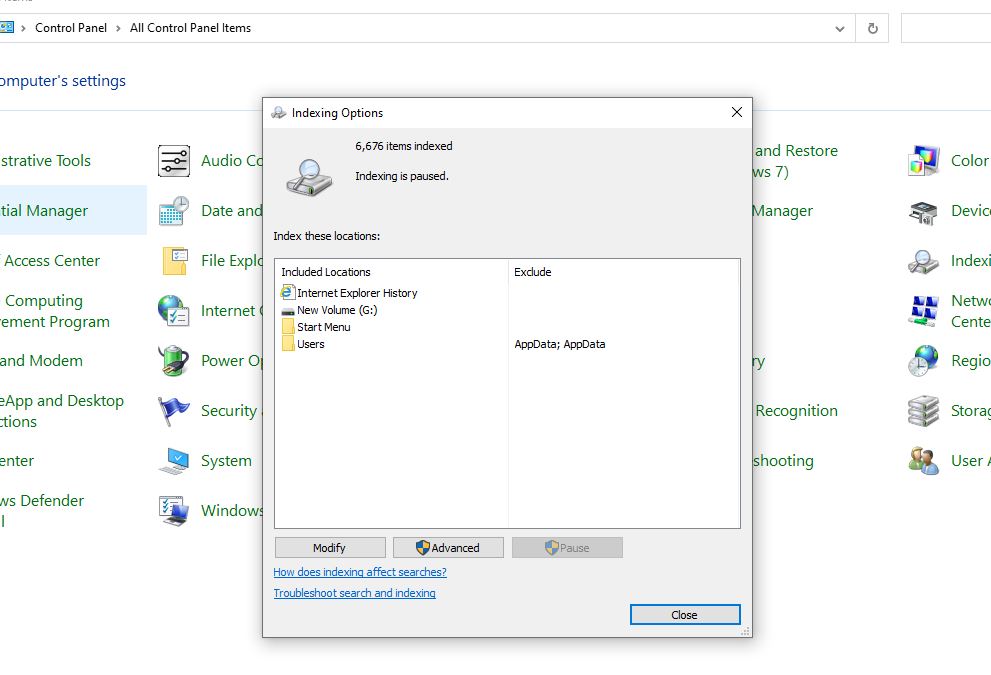
- Locate the SSD: In the Indexing Options window, you’ll see a list of locations that are being indexed. Locate your portable SSD among these.
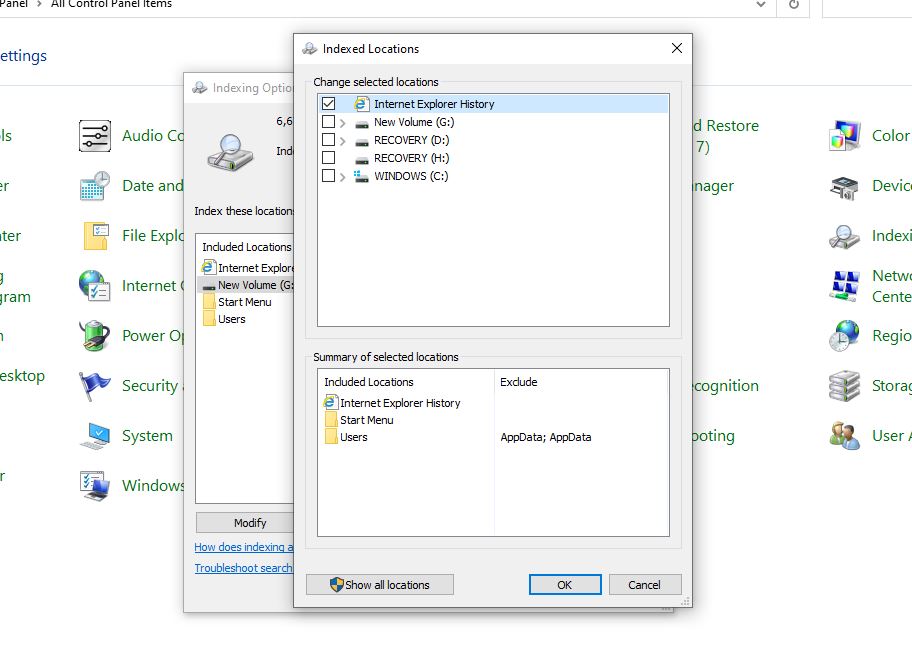
- Modify or Disable Indexing:
- On Windows: Click on “Modify,” then uncheck the boxes next to your SSD to disable indexing for that drive. Click “OK” to apply the changes.
- On macOS: Go to the “Privacy” tab in the Spotlight settings and add your SSD to the list of locations that should not be indexed.
- Apply Changes and Restart: After making the changes, it’s advisable to restart your computer to ensure that the new settings take effect.
- Monitor SSD Temperature: Once your computer is back up, use SSD monitoring software to monitor the temperature of your portable SSD. This will help you determine if disabling indexing services has had a positive impact on managing heat.
By disabling indexing services, you’re reducing the number of operations your SSD has to perform, which can lead to a decrease in heat generation. It’s a straightforward yet effective method for those looking to manage their SSD’s temperature without affecting its core functionalities.
Fix 6: Reduce Data Transfer Load
The Importance of Reducing Data Transfer Load
Continuously transferring large files or engaging in high-intensity read-and-write operations can put a significant strain on your portable SSD. This heightened activity leads to excess heat generation, which, if sustained, can push the SSD’s temperature beyond its optimal operating range.

Over time, this can result in performance degradation and even increase the risk of long-term damage. Therefore, managing your data transfer load is a crucial strategy for preventing SSD overheating. You can try to divide your read/write works between two drives if possible.
How to Reduce Data Transfer Load?
- Break into Smaller Batches: Instead of transferring large files or data sets in one go, break them into smaller batches. This reduces the continuous workload on the SSD, allowing it to operate at a cooler temperature.
- Pause Between Transfers: After completing a batch of data transfers, give the SSD a brief pause to cool down before initiating the next batch. This intermittent rest period can be particularly beneficial during extended data transfer sessions.
- Monitor SSD Temperature: Keep an eye on the SSD’s temperature during data transfers. If you notice the temperature nearing the higher end of the safe operating range, it’s a good idea to pause the transfers and allow the SSD to cool down.
- Use SSD Monitoring Tools: Utilize SSD monitoring software to keep track of temperature levels. If the temperature crosses a certain threshold, consider pausing the data transfer and allowing the SSD to cool.
By effectively managing your data transfer load, you can significantly reduce the risk of your portable SSD overheating. This not only helps in maintaining optimal performance but also extends the lifespan of the device. It’s a simple yet impactful method that can make a considerable difference in how your SSD operates.
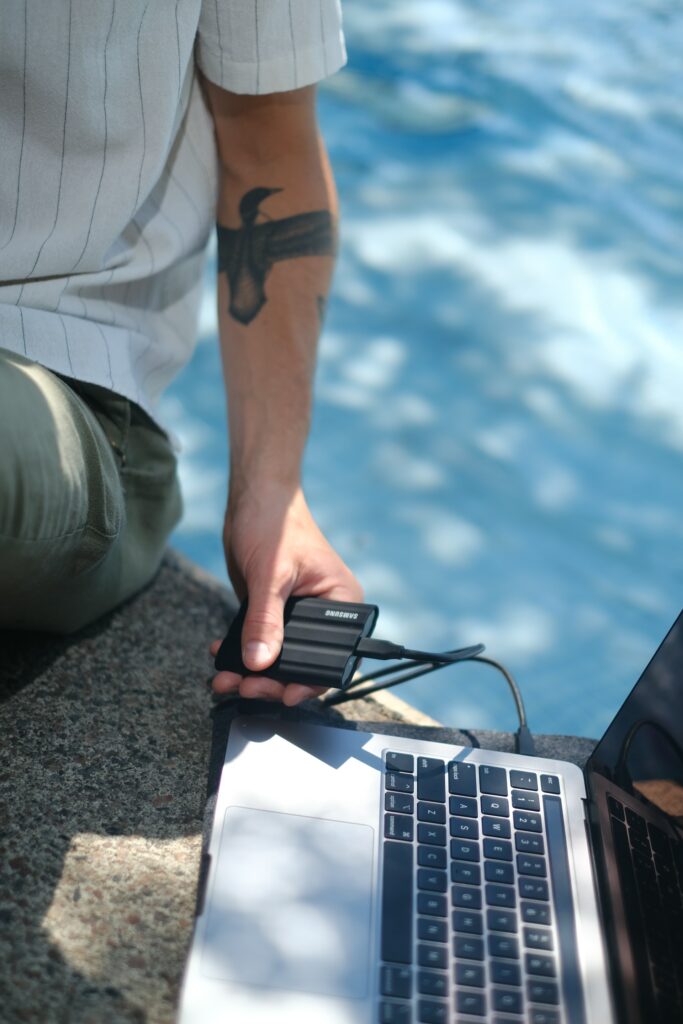
Fix 7: Avoid Direct Sunlight and Hot Environments
The Importance of Avoiding Direct Heat Sources
Exposure to direct heat sources like sunlight or heaters can exacerbate the overheating issues that portable SSDs may face. Direct heat can rapidly elevate the SSD’s temperature, pushing it beyond its safe operating range.
This can lead to immediate performance issues like thermal throttling and increase the risk of long-term damage such as data corruption or even hardware failure. Therefore, avoiding direct heat sources is a crucial preventive measure in managing SSD overheating.
How to Avoid Direct Sunlight and Hot Environments?
- Sunlight Avoidance: If you’re using your portable SSD near a window or an outdoor setting, make sure it’s not exposed to direct sunlight. Even a few minutes of direct sunlight can significantly raise the SSD’s temperature.
- Distance from Heaters: Keep the SSD at least a few feet away from heaters or other heat-generating appliances. The heat emitted from these devices can contribute to the SSD’s overheating.
- Cool Environment: Use the SSD in a climate-controlled environment whenever possible. If you’re in a room with air conditioning or a fan, it can help maintain a cooler operating temperature for the SSD.
- Check for Heat-Generating Devices: Be mindful of other devices near the SSD that could be generating heat, such as laptops, desktops, or even smartphones. Try to maintain a safe distance between the SSD and these devices.
By taking these precautions, you can effectively minimize the risk of your portable SSD overheating due to exposure to direct heat sources. It’s a simple yet vital method for ensuring that your SSD operates within its optimal temperature range, thereby preserving its performance and longevity.
Fix 8: Update Firmware
The Importance of Updating Firmware
Firmware acts as the operating system of your portable SSD, controlling various aspects of its functionality, including thermal management. Manufacturers often release firmware updates that include optimizations for better heat dissipation and overall performance.
By keeping your SSD’s firmware up-to-date, you ensure that you’re benefiting from the latest thermal management features and optimizations. This can be a significant factor in preventing overheating and maintaining the SSD’s optimal operating conditions.
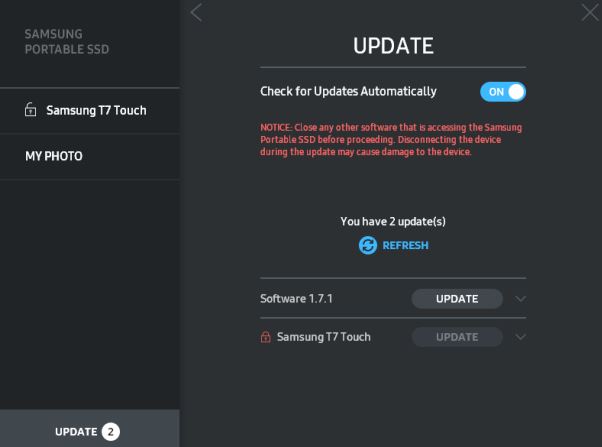
How to Update Firmware?
It is fairly easy to update the firmware if your SSD comes with its own management software package. For example, if you have Samsung’s portable SSD, you have the Samsung Magician software for everything including firmware updates. If you have WD or Sandisk SSD, you can use their PrivateAccess tool for these updates. However, you can follow these steps to update the firmware of any SSD.
- Check the Manufacturer’s Website: The first step in updating your SSD’s firmware is to visit the manufacturer’s website. Navigate to the support or downloads section to find firmware updates specific to your SSD model.
- Download the Update: Once you locate the correct firmware update, download it to your computer. Make sure to read any accompanying documentation or release notes for specific instructions or prerequisites.
- Backup Data: Before proceeding with the update, it’s advisable to backup any important data stored on the SSD. Firmware updates usually don’t result in data loss, but it’s better to be safe.
- Run the Update: Execute the firmware update process as per the manufacturer’s instructions. This usually involves running a software utility that will guide you through the update process.
- Restart and Verify: After the update is complete, you may need to restart your computer or disconnect and reconnect the SSD. Check the SSD’s settings or use monitoring software to confirm that the firmware has been updated.
By regularly updating your portable SSD’s firmware, you can take advantage of the latest thermal management features and other optimizations. This is a proactive method for preventing overheating issues and ensuring that your SSD operates at its best.
Frequently Asked Questions
Yes, prolonged overheating can lead to permanent damage to your SSD, including data corruption and hardware failure. It’s crucial to address overheating issues promptly to prevent such outcomes.
While third-party disk cleanup utilities can be effective, it’s essential to choose software that is well-reviewed and reputable. Poorly designed utilities can sometimes cause more harm than good.
Disabling indexing services may slow down file searches, but it generally won’t affect other aspects of your computer’s performance. If rapid file searching is not a priority for you, disabling indexing can be a good option for reducing SSD heat.
Firmware updates are generally safe if you follow the manufacturer’s instructions carefully. However, there’s always a small risk of data loss or corruption during the update process, so it’s advisable to back up important data before proceeding.
The frequency can vary depending on your usage. If you frequently download and delete files, running a disk cleanup utility once a month is advisable. For less intensive users, once every two to three months should suffice.
If you’ve tried multiple methods and still experience overheating, it may be time to consult professional services for a more thorough diagnosis and possible hardware replacement.
Thanks for Reading!